Archive
Zsh history command doesn’t show all history entries by default
Starting with macOS Catalina, Apple’s default shell for the Terminal changed from bash to zsh. As part of that change, the behavior of the history command changed.
Bash:
Running the history command lists all history entries.
Zsh:
Running the history command lists only the 15 most recent history entries.
To see more history entries, you can pass a numerical value to the history command. However, the bash and zsh shells handle this differently also.
Bash:
history (number_goes_here): Shows the most recent entries as defined by the number.
For example, the command shown below will show the fifteen most recent entries:
history 15
Zsh:
history (number_goes_here): Shows all entries which follow number_goes_here.
For example, the following command will show all history entries after history entry #1 (which will include all history entries):
history 1
history -(number_goes_here): Shows the most recent entries as defined by the number.
For example, the command shown below will show the fifteen most recent entries:
history -15
For those interested in why this behavior is different, I recommend reading the zshbuiltins manpage’s section on the fc command. This can be accessed by running the following command:
man zshbuiltins
The reason is that in the zsh shell, the history command’s mechanism is using the following built-in function:
fc

For my own needs, I wanted to recreate bash‘s default behavior for the history command in the zsh shell. The way I chose to do this was to add the following line to the .zshrc file in my home folder.
This file contains bidirectional Unicode text that may be interpreted or compiled differently than what appears below. To review, open the file in an editor that reveals hidden Unicode characters.
Learn more about bidirectional Unicode characters
| alias history='history 1' |

The .zshrc file is the configuration file for the zsh shell and is used to customize the zsh shell’s behavior. Adding this line to the .zshrc file will run the following command whenever the history command is invoked:
history 1
The downside to this approach is that it interferes with the original functionality of the history command. An alternative approach would be to add the following line to the .zshrc file:
This file contains bidirectional Unicode text that may be interpreted or compiled differently than what appears below. To review, open the file in an editor that reveals hidden Unicode characters.
Learn more about bidirectional Unicode characters
| alias fullhistory='history 1' |

Now all history entries will be displayed when the following command is entered:
fullhistory
Python 2.7 removed from macOS Monterey 12.3 beta
As part of the macOS Monterey 12.3 beta cycle, Apple included the following note in the publicly accessible release notes for the macOS Monterey 12.3 beta release:
This file contains bidirectional Unicode text that may be interpreted or compiled differently than what appears below. To review, open the file in an editor that reveals hidden Unicode characters.
Learn more about bidirectional Unicode characters
| Python | |
| Deprecations | |
| Python 2.7 was removed from macOS in this update. Developers should use Python 3 or an alternative language instead. (39795874) |

https://developer.apple.com/documentation/macos-release-notes/macos-12_3-release-notes
This is a development which Apple has warned about for a while, beginning with macOS Catalina’s release notes:

https://developer.apple.com/documentation/macos-release-notes/macos-catalina-10_15-release-notes
Apple has not included a Python 3 runtime with macOS Monterey, so the removal of Python 2.7 from macOS 12.3 and later will mean that Apple is no longer shipping a Python runtime as part of macOS.
For those who want or need to use an Apple-supplied Python distribution, Python 3 is included as part of Xcode and the Xcode Command Line Tools. Those tools are not part of macOS and will need to be installed separately.
As an alternative, a number of shops have been deploying their own Python 3 distribution. For more information on this, please see Greg Neagle’s Snakes on a Plan session from MacSysAdmin 2020:
Session slides:
http://docs.macsysadmin.se/2020/pdf/SnakesOnAPlan.pdf
Session video:
http://docs.macsysadmin.se/2020/video/Day1Session1.mp4
Jamf Pro server installer for macOS retirement planned for March 2022
To follow up on my earlier post on the Jamf Pro Server Installer for macOS being retired, Jamf has added the following to the Deprecations and Removals section of the Jamf Pro 10.35.0 release notes:
Support ending for the Jamf Pro Server Installer for macOS—Support for using the Jamf Pro Installer for macOS will be discontinued in a future release (estimated removal date: March 2022). Mac computers with Apple silicon are not supported by the Jamf Pro Installer for macOS. If you want to migrate your Jamf Pro server from macOS to Jamf Cloud, contact Jamf Support via Jamf Account. If you want to keep your server on premise, you can migrate your Jamf Pro server from macOS to one of the following servers: Red Hat Enterprise Linux, Ubuntu, or Windows. For more information, see the Migrating to Another Server article.

For those folks who are running on-premise Jamf Pro servers on Macs, I strongly recommend contacting Jamf Support and plan a migration if you haven’t already. As of January 14th, 2022, Jamf’s published support for running Jamf Pro includes the following OS, database and Java versions:
This file contains bidirectional Unicode text that may be interpreted or compiled differently than what appears below. To review, open the file in an editor that reveals hidden Unicode characters.
Learn more about bidirectional Unicode characters
| Recommended Configuration: | |
| Operating Systems: | |
| Windows Server 2019 | |
| Ubuntu Server 20.04 LTS | |
| Red Hat Enterprise Linux 7.x | |
| Database software versions: | |
| MySQL 8.0 – InnoDB | |
| Amazon Aurora (MySQL 5.7 compatible) | |
| MySQL 5.7.13 or later – InnoDB | |
| Java version: | |
| OpenJDK 11 | |
| Minimum Supported: | |
| Operating Systems: | |
| Windows Server 2016 | |
| Windows Server 2012 R2 | |
| Ubuntu Server 18.04 LTS | |
| macOS 10.15 | |
| macOS 10.14 | |
| Database software versions: | |
| MySQL 5.7.13 – InnoDB | |
| MySQL 5.7.13 on Amazon RDS – InnoDB | |
| Java version: | |
| Oracle Java 11 |
Backing up Self Service icon graphic files from Jamf Pro
While working with Self Service policies on Jamf Pro, I prefer to download the graphic files used for the Self Service icons and back them up to GitHub or a similar internal source control tool. The reasons I do this are the following:
- I have an off-server backup for the graphic files.
- I can track changes to the Self Service policy icons.
To help me manage this, I have a script which does the following:
- Use the Jamf Pro Classic API to identify which policies are Self Service policies with icons.
- Download each Self Service icon’s graphic file using the URI for each file.
- Save the downloaded graphics file to a specified download directory, using a filename format like shown below:
policy_name_here-jamf_pro_policy_id_here-graphics_file_name_here
As part of the download process, any spaces are removed from the graphic file’s file names and the policy names. Any colons ( : ) are likewise replaced with dashes ( – ) to prevent problems for the macOS filesystem.
For more details, please see below the jump.
Amazon Web Services’s new EC2 metadata tag option doesn’t allow spaces in tag names
Beginning on January 6th, Amazon Web Services added a new option to include your instance’s tags as part of the instance’s metadata when the instance is launched:
By including this data in the instance metadata, this information no longer needs the DescribeInstances or DescribeTags API calls to retrieve tag information. For shops which use tag information extensively, this will cut down on the number of API calls you need to make and allow tag retrieval to scale better.
There is one limitation: tags stored in metadata cannot have spaces. If you have the “tags in metadata” option enabled and you have a tag with spaces in it, you’ll see a message similar to the one below:
‘Tag Name Here’ is not a valid tag key. Tag keys must match pattern ([0-9a-zA-Z-_+=,.@:]{1,255}), and must not be a reserved name (‘.’, ‘..’, ‘_index’)
This was an issue for me yesterday because I’m using AWS’s Patch Manager to keep my instances updated and that uses the following tag:
Patch Group
This tag must be used by patching groups and is referenced in the documentation this way:
Patch groups require use of the tag key Patch Group. You can specify any tag value, but the tag key must be Patch Group.
https://docs.aws.amazon.com/systems-manager/latest/userguide/sysman-patch-group-tagging.html

The result was that I set up a new instance yesterday with my tags, including the Patch Group tag, and received the following message when I tried to launch the instance:
‘Patch Group’ is not a valid tag key. Tag keys must match pattern ([0-9a-zA-Z-_+=,.@:]{1,255}), and must not be a reserved name (‘.’, ‘..’, ‘_index’)
I put in a ticket to AWS Support and the fix is the following:
When setting up new EC2 instances, make sure that the Allow tags in metadata setting under the Advanced Details section is set to Disabled.

This turns off including your instance’s tags with the instance’s metadata as part of the instance’s launch. This addresses the issue because tag information will not be added to your instance’s metadata and thus removes the metadata tagging limitations from the instance creation process. Now your tags can include spaces again, though you’re also back to having to retrieve tag information via the API.
On Monday, January 10th 2022, the Allow tags in metadata setting was set to Enabled by default. However, I suspect AWS got enough support calls about this particular issue that they made a change to the default settings. As of Tuesday, January 11th 2022, the Allow tags in metadata setting is now set to Disabled by default.
Identifying Intel Macs with Secure Enclave using Jamf Pro
Identifying Intel Macs with Secure Enclave using Jamf Pro
As part of a recent task, I needed to identify using Jamf Pro which Macs in our environment have Secure Enclave and which Macs do not. For Intel Macs, having Secure Enclave means that you have one of the following Macs:
Macs with the Apple T1 Security Chip
- MacBook Pro (13-inch with Touch Bar, Late 2016)
- MacBook Pro (15-inch with Touch Bar, Late 2016)
- MacBook Pro (13-inch with Touch Bar, Mid-2017)
- MacBook Pro (15-inch with Touch Bar, Mid-2017)
Macs with the Apple T2 Security Chip
- iMac (Retina 5K, 27-inch, 2020)
- iMac Pro
- Mac Pro (2019)
- Mac Pro (Rack, 2019)
- Mac mini (2018)
- MacBook Air (Retina, 13-inch, 2020)
- MacBook Air (Retina, 13-inch, 2019)
- MacBook Air (Retina, 13-inch, 2018)
- MacBook Pro (13-inch, 2020, Two Thunderbolt 3 ports)
- MacBook Pro (13-inch, 2020, Four Thunderbolt 3 ports)
- MacBook Pro (16-inch, 2019)
- MacBook Pro (13-inch, 2019, Two Thunderbolt 3 ports)
- MacBook Pro (15-inch, 2019)
- MacBook Pro (13-inch, 2019, Four Thunderbolt 3 ports)
- MacBook Pro (15-inch, 2018)
- MacBook Pro (13-inch, 2018, Four Thunderbolt 3 ports)
Jamf Pro doesn’t have a specific “this Mac has Secure Enclave” inventory identifier, so I decided to use Apple’s documentation on which Intel Mac models have Secure Enclave to build Jamf Pro smart groups with model identifiers. With Apple’s move to Apple Silicon processors, this list of models should not be added to in the future.
For Intel Macs equipped with T1 chips, here are the relevant model identifiers:
This file contains bidirectional Unicode text that may be interpreted or compiled differently than what appears below. To review, open the file in an editor that reveals hidden Unicode characters.
Learn more about bidirectional Unicode characters
| MacBookPro13,2 | |
| MacBookPro13,3 | |
| MacBookPro14,2 | |
| MacBookPro14,3 |
For Intel Macs equipped with T2 chips, here are the relevant model identifiers:
This file contains bidirectional Unicode text that may be interpreted or compiled differently than what appears below. To review, open the file in an editor that reveals hidden Unicode characters.
Learn more about bidirectional Unicode characters
| iMac20,1 | |
| iMacPro1,1 | |
| MacPro7,1 | |
| Macmini8,1 | |
| MacBookAir8,1 | |
| MacBookAir8,2 | |
| MacBookAir9,1 | |
| MacBookPro15,1 | |
| MacBookPro15,2 | |
| MacBookPro15,3 | |
| MacBookPro15,4 | |
| MacBookPro16,1 | |
| MacBookPro16,2 | |
| MacBookPro16,3 | |
| MacBookPro16,4 |
For more details, please see below the jump.
Updated script for obtaining, checking and renewing Bearer Tokens for the Classic and Jamf Pro APIs
Following my earlier posts on obtaining, checking and renewing Bearer Tokens for the Jamf Pro API and the deprecation of Basic Authentication for the Jamf Pro Classic API, @bryson3gps reached out to let me know there was a simpler way to get the Bearer Token which didn’t require the prior encoding of the username and password credentials in base64 format.
The command shown below will handle obtaining the token using Basic Authentication on macOS Monterey and later:
This file contains bidirectional Unicode text that may be interpreted or compiled differently than what appears below. To review, open the file in an editor that reveals hidden Unicode characters.
Learn more about bidirectional Unicode characters
| curl -X POST -u username:password -s https://server.name.here/api/v1/auth/token | plutil -extract token raw – |
The command shown below will handle obtaining the token using Basic Authentication on macOS Big Sur and earlier:
This file contains bidirectional Unicode text that may be interpreted or compiled differently than what appears below. To review, open the file in an editor that reveals hidden Unicode characters.
Learn more about bidirectional Unicode characters
| curl -X POST -u username:password -s https://server.name.here/api/v1/auth/token | python -c 'import sys, json; print json.load(sys.stdin)["token"]' |
This allows the following functions to be collapsed into one command:
- Encoding the username and password in base64 format
- Obtaining a Bearer Token using Basic Authentication
- Storing the Bearer Token (if command is used in a variable.)
He also pointed out that I was using an incorrect API call for the validation check which uses HTTP status codes. What I had:
This file contains bidirectional Unicode text that may be interpreted or compiled differently than what appears below. To review, open the file in an editor that reveals hidden Unicode characters.
Learn more about bidirectional Unicode characters
| /usr/bin/curl –write-out %{http_code} –silent –output /dev/null "${jamfpro_url}/api/v1/auth/keep-alive" –request POST –header "Authorization: Bearer ${api_token}" |
While this worked, it was using the keepalive endpoint with a POST request, which is used to invalidate tokens and issue new ones. I’ve updated to use this instead:
This file contains bidirectional Unicode text that may be interpreted or compiled differently than what appears below. To review, open the file in an editor that reveals hidden Unicode characters.
Learn more about bidirectional Unicode characters
| /usr/bin/curl –write-out %{http_code} –silent –output /dev/null "${jamfpro_url}/api/v1/auth" –request GET –header "Authorization: Bearer ${api_token}" |
This API call sends a GET request to the auth endpoint, which returns all the authorization details associated with the current Bearer Token. This will work for the validation check and won’t trigger accidental invalidation of the existing Bearer Token.
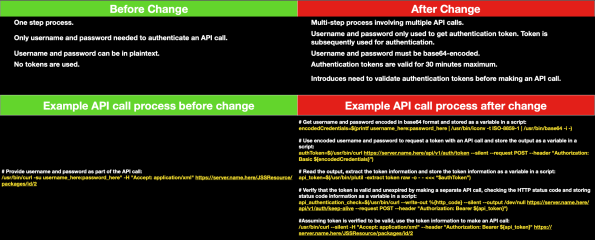
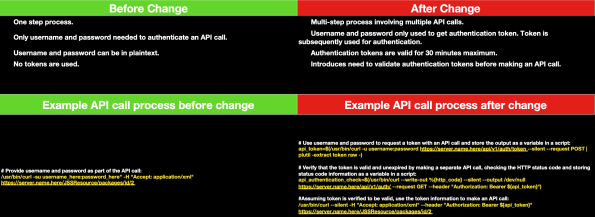
With this in mind, the process of obtaining Bearer Tokens is now simplified. This affects the deprecation of the Classic API for Jamf Pro 10.35.0 and later by changing the workflow from this:

To this:

I’ve incorporated these changes into an updated script with functions for obtaining, checking and renewing Bearer Tokens for the Classic (for Jamf Pro 10.35.0 and later) and Jamf Pro APIs. For more details, please see below the jump.
Basic Authentication deprecated for the Jamf Pro Classic API
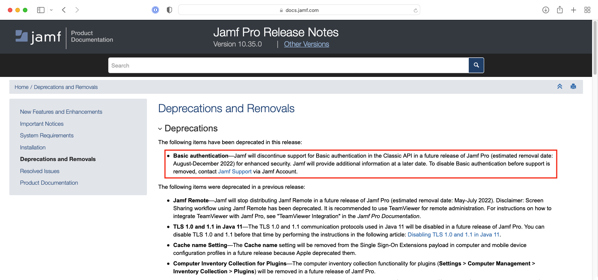
As part of the release of Jamf Pro 10.35, the following note was added to the Deprecations and Removals section of the Jamf Pro 10.35.0 Release Notes:
Basic authentication — Jamf will discontinue support for Basic authentication in the Classic API in a future release of Jamf Pro (estimated removal date: August-December 2022) for enhanced security. Jamf will provide additional information at a later date. To disable Basic authentication before support is removed, contact Jamf Support via Jamf Account.

To help folks prepare for this change, as of Jamf Pro 10.35.0, both Basic Authentication and using Bearer Tokens generated by the Jamf Pro API can be used for Jamf Pro Classic API authentication. This is noted in the New Features and Enhancements section of the Jamf Pro 10.35.0 release notes:
You can now use the Classic API to authenticate using Basic authentication or a Bearer Token retrieved through the /v1/auth/token Jamf Pro API endpoint for enhanced security. For information on Bearer Token authentication, see the Jamf developer resources: https://developer.jamf.com/jamf-pro/docs/classic-api-authentication-changes

For more details, please see below the jump.
2021 Holiday Vacation Project
Like a lot of folks, I took some time off around the holidays. Before then, I decided I wanted to accomplish a couple of things while I was off.
- Goal 1: Set up a personal status board for my office, where at a glance I could find useful information.
- Goal 2: Figure out how to be able to play the Star Wars arcade game whenever I wanted to.
I’m happy to say that I was able to accomplish my goal by December 31st, 2021. For more details, please see below the jump.
Recent Comments