Archive
Updated scripts for downloading packages from a JCDS2 distribution point
As part of an earlier post, I had provided scripts for downloading installer packages from a JCDS2 distribution point. I’ve made some updates to the scripts to provide more checking of the installer packages, to hopefully ensure that the downloaded installer package and the package available in the JCDS2 distribution point are exactly the same package.
The original scripts would check the download directory and see if there was an installer package with the same name as an installer package in the JCDS2 distribution point. If there was an installer package with a matching name, download of the installer package was skipped and the script would move on to the next installer package.
In the updated scripts, if there are installer packages already in the download directory which have the same name as an installer package in the JCDS distribution point, the MD5 hash of the existing installer package is checked against the MD5 hash of the installer package stored in the JCDS distribution point.
If the MD5 hashes match, download of the installer package with the matching name is skipped. If the MD5 hashes do not match, the existing installer package in the download directory is deleted and a fresh copy of the installer package is downloaded. For more details, please see below the jump.
Migrating a Jamf Pro AWS-hosted cloud distribution point to a JCDS2 cloud distribution point
I recently needed to migrate a Jamf Cloud-hosted Jamf Pro instance from using an AWS-hosted cloud distribution point to using a Jamf-hosted JCDS2 cloud distribution point. For those looking at a similar migration, please see below the jump for more details.
Using the Jamf Pro API to download installer packages from a JCDS2 distribution point
As part of Jamf’s release of Jamf Cloud Distribution Service 2.0, Jamf has added the ability to communicate with a JCDS 2 distribution point via the Jamf Pro API:

Among these new API capabilities is the ability to query a JCDS 2 DP for download links, for the installer packages stored in the distribution point.
https://developer.jamf.com/jamf-pro/reference/get_v1-jcds-files-filename

I’m interested in this because I’ve had an existing workflow for downloading installer packages from a non-JCDS AWS-hosted cloud distribution point, where I’ve been using AWS’s awscli command line tool to run a one-way synchronization process between the cloud distribution point in Amazon’s S3 service and a local directory stored on a Mac.
For those who want to use this new capability, I’ve written a script which uses the Jamf Pro Classic API and Jamf Pro API to get the list of installer packages on a Jamf Pro server, retrieve the associated download links and download the installer packages to a directory on my Mac. For more details, please see below the jump.
Manually triggering MDM profile renewal with Jamf Pro
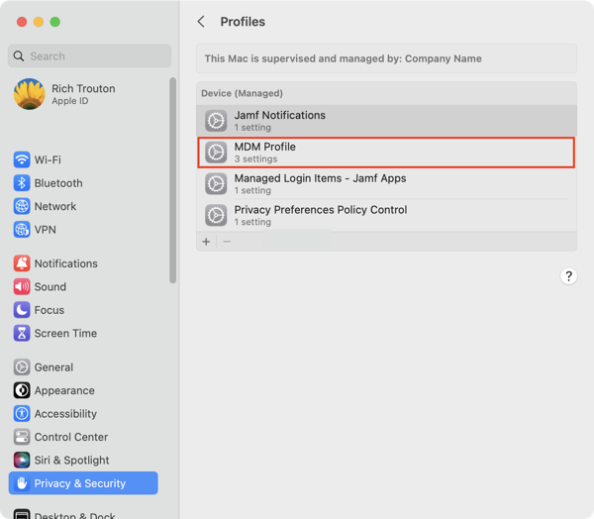
When you enroll a Mac with Jamf Pro, the first profile the Mac receives is named MDM Profile.

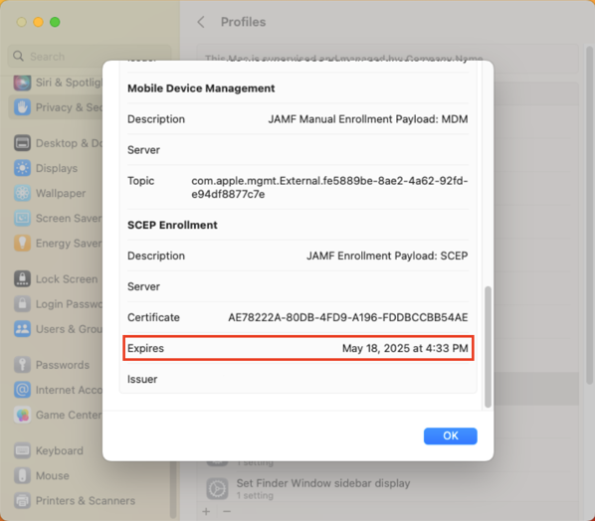
It is valid for two years.

After two years, the MDM profile is supposed to automatically renew but sometimes this renewal process is either not triggered or is triggered and does not succeed.
On Jamf Pro, there’s a couple of ways you can manually trigger the MDM renewal to occur. The first is a manual process which uses the Jamf Pro admin console. The second uses both of Jamf Pro’s APIs and can be automated via a Jamf Pro policy. For more details, please see below the jump.
Using the Jamf Pro API to retrieve FileVault personal recovery keys
As part of Jamf Pro 10.43’s release, Jamf has added the ability to access and retrieve FileVault personal recovery keys via the Jamf Pro API:
- Return FileVault information for a specific computer: https://developer.jamf.com/jamf-pro/reference/get_v1-computers-inventory-id-filevault
- Return paginated FileVault information for all computers: https://developer.jamf.com/jamf-pro/reference/get_v1-computers-inventory-filevault
For those who want to use this new capability, I’ve written a script which uses the Jamf Pro Classic API and Jamf Pro API to take a list of Jamf Pro computer IDs from a plaintext file, retrieve the associated Macs’ FileVault personal recovery keys and generate a report in .tsv format.
For more details, please see below the jump.
Session videos from Jamf Nation User Conference 2022 now available
Jamf has posted the session videos for Jamf Nation User Conference 2022, including the video for my Running Jamf Pro at Scale, from SAP with ❤️ session.
For those interested, all of the the JNUC 2022 session videos are available on YouTube. For convenience, I’ve linked my session here.
Using the Jamf Pro API to report on Self Service policies
Every so often, it may be necessary to generate a report from Jamf Pro of which policies are available in Self Service. To assist with this task, I’ve written a script which uses the Jamf Pro Classic API to search through the policy records and generate a report in .tsv format.
For more details, please see below the jump.
Building Jamf Pro smart groups for Ventura-compatible and Ventura-incompatible Mac models
As part of preparing for macOS Ventura, it may be useful to have a way to easily distinguish between the Macs in your fleet which can run macOS Ventura and those which can’t. Apple has published the following list of Macs which are compatible with Ventura, which will help with both identitying the compatible Mac models as well as the incompatible Mac models.
- iMac: 2017 and later models
- iMac Pro: All models
- MacBook: 2017 and later models
- MacBook Pro: 2017 and later models
- MacBook Air: 2018 and later models
- Mac Mini: 2018 or later models
- Mac Pro: 2019 or later models
- Mac Studio: All models
From there, here’s the list of Mac models which are compatible with macOS Ventura:
This file contains bidirectional Unicode text that may be interpreted or compiled differently than what appears below. To review, open the file in an editor that reveals hidden Unicode characters.
Learn more about bidirectional Unicode characters
| Mac13,1 | |
| Mac13,2 | |
| Mac14,2 | |
| Mac14,7 | |
| MacBook10,1 | |
| MacBookAir10,1 | |
| MacBookAir8,1 | |
| MacBookAir8,2 | |
| MacBookAir9,1 | |
| MacBookPro14,1 | |
| MacBookPro14,2 | |
| MacBookPro14,3 | |
| MacBookPro15,1 | |
| MacBookPro15,2 | |
| MacBookPro15,3 | |
| MacBookPro15,4 | |
| MacBookPro16,1 | |
| MacBookPro16,2 | |
| MacBookPro16,3 | |
| MacBookPro16,4 | |
| MacBookPro17,1 | |
| MacBookPro18,1 | |
| MacBookPro18,2 | |
| MacBookPro18,3 | |
| MacBookPro18,4 | |
| MacPro7,1 | |
| Macmini8,1 | |
| Macmini9,1 | |
| VirtualMac2,1 | |
| iMac18,1 | |
| iMac18,2 | |
| iMac18,3 | |
| iMac19,1 | |
| iMac19,2 | |
| iMac20,1 | |
| iMac20,2 | |
| iMac21,1 | |
| iMac21,2 | |
| iMacPro1,1 | |
| iSim1,1 |
We can use this information to build smart groups which can help identify which Macs are compatible with Ventura and which are not. For more details, see below the jump:
Backing up Self Service icon graphic files from Jamf Pro
While working with Self Service policies on Jamf Pro, I prefer to download the graphic files used for the Self Service icons and back them up to GitHub or a similar internal source control tool. The reasons I do this are the following:
- I have an off-server backup for the graphic files.
- I can track changes to the Self Service policy icons.
To help me manage this, I have a script which does the following:
- Use the Jamf Pro Classic API to identify which policies are Self Service policies with icons.
- Download each Self Service icon’s graphic file using the URI for each file.
- Save the downloaded graphics file to a specified download directory, using a filename format like shown below:
policy_name_here-jamf_pro_policy_id_here-graphics_file_name_here
As part of the download process, any spaces are removed from the graphic file’s file names and the policy names. Any colons ( : ) are likewise replaced with dashes ( – ) to prevent problems for the macOS filesystem.
For more details, please see below the jump.
Updated script for obtaining, checking and renewing Bearer Tokens for the Classic and Jamf Pro APIs
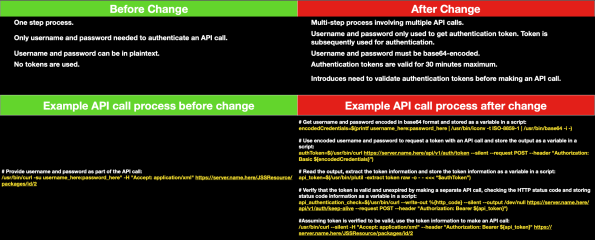
Following my earlier posts on obtaining, checking and renewing Bearer Tokens for the Jamf Pro API and the deprecation of Basic Authentication for the Jamf Pro Classic API, @bryson3gps reached out to let me know there was a simpler way to get the Bearer Token which didn’t require the prior encoding of the username and password credentials in base64 format.
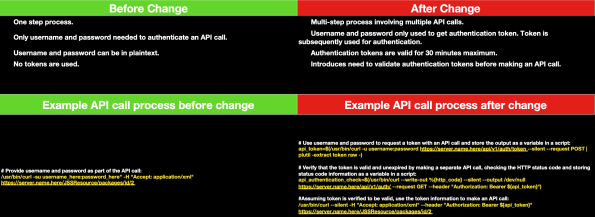
The command shown below will handle obtaining the token using Basic Authentication on macOS Monterey and later:
This file contains bidirectional Unicode text that may be interpreted or compiled differently than what appears below. To review, open the file in an editor that reveals hidden Unicode characters.
Learn more about bidirectional Unicode characters
| curl -X POST -u username:password -s https://server.name.here/api/v1/auth/token | plutil -extract token raw – |
The command shown below will handle obtaining the token using Basic Authentication on macOS Big Sur and earlier:
This file contains bidirectional Unicode text that may be interpreted or compiled differently than what appears below. To review, open the file in an editor that reveals hidden Unicode characters.
Learn more about bidirectional Unicode characters
| curl -X POST -u username:password -s https://server.name.here/api/v1/auth/token | python -c 'import sys, json; print json.load(sys.stdin)["token"]' |
This allows the following functions to be collapsed into one command:
- Encoding the username and password in base64 format
- Obtaining a Bearer Token using Basic Authentication
- Storing the Bearer Token (if command is used in a variable.)
He also pointed out that I was using an incorrect API call for the validation check which uses HTTP status codes. What I had:
This file contains bidirectional Unicode text that may be interpreted or compiled differently than what appears below. To review, open the file in an editor that reveals hidden Unicode characters.
Learn more about bidirectional Unicode characters
| /usr/bin/curl –write-out %{http_code} –silent –output /dev/null "${jamfpro_url}/api/v1/auth/keep-alive" –request POST –header "Authorization: Bearer ${api_token}" |
While this worked, it was using the keepalive endpoint with a POST request, which is used to invalidate tokens and issue new ones. I’ve updated to use this instead:
This file contains bidirectional Unicode text that may be interpreted or compiled differently than what appears below. To review, open the file in an editor that reveals hidden Unicode characters.
Learn more about bidirectional Unicode characters
| /usr/bin/curl –write-out %{http_code} –silent –output /dev/null "${jamfpro_url}/api/v1/auth" –request GET –header "Authorization: Bearer ${api_token}" |
This API call sends a GET request to the auth endpoint, which returns all the authorization details associated with the current Bearer Token. This will work for the validation check and won’t trigger accidental invalidation of the existing Bearer Token.
With this in mind, the process of obtaining Bearer Tokens is now simplified. This affects the deprecation of the Classic API for Jamf Pro 10.35.0 and later by changing the workflow from this:

To this:

I’ve incorporated these changes into an updated script with functions for obtaining, checking and renewing Bearer Tokens for the Classic (for Jamf Pro 10.35.0 and later) and Jamf Pro APIs. For more details, please see below the jump.
Recent Comments