Archive
Identifying Mac laptops and desktops from the command line by checking for a built-in battery
Every so often, it may be necessary for Mac admins to deploy a script that can apply different settings to Mac desktops and laptops. A good example may be using the pmset command to apply Energy Saver settings, where you may want to apply one set of power management settings to laptops and a different set to desktops.
This file contains bidirectional Unicode text that may be interpreted or compiled differently than what appears below. To review, open the file in an editor that reveals hidden Unicode characters.
Learn more about bidirectional Unicode characters
| #!/bin/bash | |
| # Set separate power management settings for desktops and laptops | |
| # If it's a laptop, the power management settings for "Battery" are set to have the computer sleep in 15 minutes, | |
| # disk will spin down in 10 minutes, the display will sleep in 5 minutes and the display itself will dim to | |
| # half-brightness before sleeping. While plugged into the AC adapter, the power management settings for "Charger" | |
| # are set to have the computer never sleep, the disk doesn't spin down, the display sleeps after 30 minutes and | |
| # the display dims before sleeping. | |
| # | |
| # If it's not a laptop (i.e. a desktop), the power management settings are set to have the computer never sleep, | |
| # the disk doesn't spin down, the display sleeps after 30 minutes and the display dims before sleeping. | |
| # | |
| # Detects if this Mac is a laptop or not by checking the model ID for the word "Book" in the name. | |
| IS_LAPTOP=$(/usr/sbin/system_profiler SPHardwareDataType | grep "Model Identifier" | grep "Book") | |
| if [[ -n "$IS_LAPTOP" ]]; then | |
| /usr/bin/pmset -b sleep 15 disksleep 10 displaysleep 5 halfdim 1 | |
| /usr/bin/pmset -c sleep 0 disksleep 0 displaysleep 30 halfdim 1 | |
| else | |
| /usr/bin/pmset sleep 0 disksleep 0 displaysleep 30 halfdim 1 | |
| fi |
In the example above, the Model Identifier information from the system_profiler command is used to help identify if the Mac is a desktop or laptop. In this case, the Model Identifier information is checked to see if the model identifier contains “Book”.

If it does, it’s a laptop. Otherwise, it’s a desktop:
This file contains bidirectional Unicode text that may be interpreted or compiled differently than what appears below. To review, open the file in an editor that reveals hidden Unicode characters.
Learn more about bidirectional Unicode characters
| /usr/sbin/system_profiler SPHardwareDataType | grep "Model Identifier" | grep "Book" |
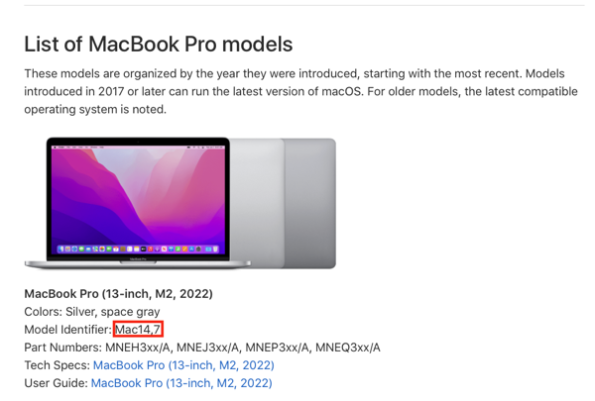
However, the latest Mac laptops’ model identifier does not contain “Book”. This means that this identification method should no longer be considered reliable.

What’s an alternative way to check? One way is to use the ioreg command to see if the Mac in question has a built-in battery or not. Laptops will have a built-in battery and desktops will not. For more details, please see below the jump.
When does the upgrade to macOS Ventura need admin rights?
Upgrading to macOS Ventura from macOS Monterey or earlier seems like it should be a straightforward process.
1. Open System Preferences
2. Click on Software Update.

3. If the macOS Ventura upgrade is listed there, click on the Upgrade Now button.

However, you may get different upgrade experiences depending on whether you are running macOS 12.3 or later, or if you’re running macOS 12.21 or earlier.
macOS 12.3 or later:
1. You see a macOS Ventura installer which is around 6 GBs or less.

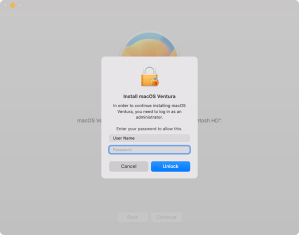
2. When you click Upgrade Now, you are asked to authenticate as a user. Not as a user with administrator privileges, just as a user.

macOS 12.2.1 or earlier
1. You see a macOS Ventura installer which is around 12 GBs or more.

2. It downloads an Install macOS Ventura app to your Mac and installs it in /Applications.

3. The Install macOS Ventura app automatically launches once download and installation of the application completes.

4. Running the Install macOS Ventura app will prompt for a user with administrator privileges to authenticate before the upgrade proceeds.

Why the difference? The reason is that Apple has developed a new software upgrade path to macOS Ventura for Macs running macOS 12.3 or later which doesn’t require the following:
- The need to run the macOS Ventura full installer
- The requirement to authenticate as an administrator before upgrading from macOS Monterey to macOS Ventura.
Apple did include additional logic for macOS Ventura upgrades for upgrading to Ventura 13.0.0 and 13.0.1, where if a Mac running macOS Monterey 12.3 or later was enrolled with an MDM management solution and was thus in supervised mode, the new software upgrade path was disabled for those Macs.
As of the release of macOS 13.1, this logic no longer applies and supervised Macs may be offered the new upgrade path (which doesn’t require admin rights to upgrade.)
For more details about this, and information on how to block the macOS Ventura upgrade from appearing in Software Update if your organization needs more time, please see the Apple KBase article linked below:
- Manage upgrading to macOS Ventura in your organization: https://support.apple.com/HT213471
My colleague Robert Hammen has also written on the topic of delaying upgrades, so if you’re interested in that topic, please see his Medium post linked below:
- Holding Back the OS Upgrades: https://hammen.medium.com/holding-back-the-os-upgrades-6c2d97f99ac3
Using AutoPkg to build installers for Palo Alto’s GlobalProtect VPN software
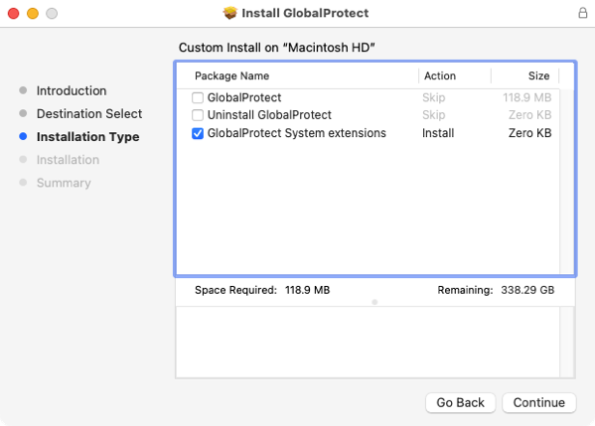
As part of some recent testing, I needed to do some work with Palo Alto’s GlobalProtect VPN software. Palo Alto provides an installer package for GlobalProtect, but it has some interesting characteristics as the installer includes three installation options. One is enabled by default and the other two are disabled by default.
The first configuration is the option to install GlobalProtect, the default enabled configuration:

The second configuration is the option to uninstall GlobalProtect, which is disabled by default:

The third configuration is the option to enable the System Extension for GlobalProtect, which is disabled by default:

Note: In the image above, I’ve done some photoshopping because checking the third option to enable the System Extension for GlobalProtect also enables the option to install GlobalProtect. I made the change to the image to hopefully make more clear which option I was discussing.
The options to uninstall GlobalProtect and enable the System Extension for GlobalProtect can be managed by using an installer choices XML file to selectively enable only the desired option. For example, here’s the installer choices XML file for enabling only the option to uninstall GlobalProtect:
This file contains bidirectional Unicode text that may be interpreted or compiled differently than what appears below. To review, open the file in an editor that reveals hidden Unicode characters.
Learn more about bidirectional Unicode characters
| <?xml version="1.0" encoding="UTF-8"?> | |
| <!DOCTYPE plist PUBLIC "-//Apple//DTD PLIST 1.0//EN" "http://www.apple.com/DTDs/PropertyList-1.0.dtd"> | |
| <plist version="1.0"> | |
| <array> | |
| <dict> | |
| <key>attributeSetting</key> | |
| <integer>1</integer> | |
| <key>choiceAttribute</key> | |
| <string>selected</string> | |
| <key>choiceIdentifier</key> | |
| <string>second</string> | |
| </dict> | |
| <dict> | |
| <key>attributeSetting</key> | |
| <integer>1</integer> | |
| <key>choiceAttribute</key> | |
| <string>selected</string> | |
| <key>choiceIdentifier</key> | |
| <string>com.paloaltonetworks.globalprotect.uninstall.pkg</string> | |
| </dict> | |
| </array> | |
| </plist> |
Here’s the installer choices XML file for enabling only the option to enable the System Extension for GlobalProtect:
This file contains bidirectional Unicode text that may be interpreted or compiled differently than what appears below. To review, open the file in an editor that reveals hidden Unicode characters.
Learn more about bidirectional Unicode characters
| <?xml version="1.0" encoding="UTF-8"?> | |
| <!DOCTYPE plist PUBLIC "-//Apple//DTD PLIST 1.0//EN" "http://www.apple.com/DTDs/PropertyList-1.0.dtd"> | |
| <plist version="1.0"> | |
| <array> | |
| <dict> | |
| <key>attributeSetting</key> | |
| <integer>1</integer> | |
| <key>choiceAttribute</key> | |
| <string>selected</string> | |
| <key>choiceIdentifier</key> | |
| <string>third</string> | |
| </dict> | |
| <dict> | |
| <key>attributeSetting</key> | |
| <integer>1</integer> | |
| <key>choiceAttribute</key> | |
| <string>selected</string> | |
| <key>choiceIdentifier</key> | |
| <string>com.paloaltonetworks.globalprotect.systemext.pkg</string> | |
| </dict> | |
| </array> | |
| </plist> |
Using these options, I was able to build recipes for AutoPkg which would automatically build three installer packages:
- An installer which installs GlobalProtect.
- An installer which uninstalls GlobalProtect.
- An installer which enables the System Extension for GlobalProtect.
The reason I chose to do this is that using AutoPkg to create these additional installer packages should help ensure any changes that Palo Alto makes to GlobalProtect’s uninstall and System Extension enablement will automatically be available whenever a new version of GlobalProtect is picked up by AutoPkg. In turn, this should save work for those deploying GlobalProtect because now they don’t need to figure out what may have changed between GlobalProtect releases. For more details, please see below the jump.
Creating a NexThink uninstaller for deployment via Jamf Pro
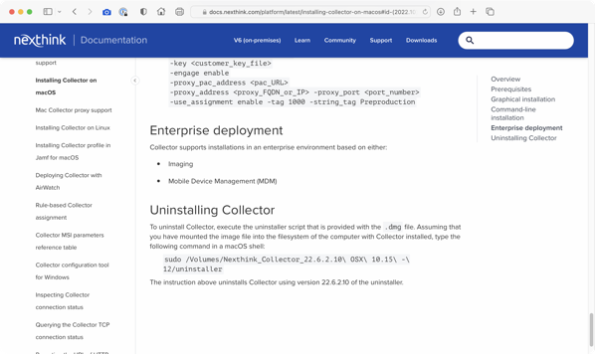
As a follow-up to my previous post on building an installer for NexThink Collector which could be deployed via Jamf Pro, I also needed to build an uninstaller for this software. Fortunately, NexThink ships an uninstaller script on the same disk image that it uses to ship its installer.

NexThink’s install documentation for the macOS version of the Collector software assumes that a human is doing the following to run the uninstall process:
A. Mounting the disk image
B. Opening the Terminal application
C. Using the uninstaller script to run the uninstallation process.

In my case, I decided to do the following to deploy the uninstaller via Jamf Pro:
- Wrap the disk image inside a separate installer package.
- Use a postinstall script to perform the following actions:
A. Identify the location of the disk image stored inside the installer package.
B. Mount the disk image
C. Use the uninstall script to uninstall the NexThink Collector software.
D. Unmount the disk image.
For more details, please see below the jump.
Creating a NexThink installer for deployment via Jamf Pro
A while back, I had to build an installer for NexThink Collector which could be deployed via Jamf Pro. NexThink can be interesting to deploy because the installation process:
- Involves an application named csi.app, which has a command line tool.
- The referenced csi app’s command line tool configures and runs an installer package.
- The command line tool also needs to reference a license file, which NexThink refers to as a CustomerKey file.
The CustomerKey file should look similar to what’s shown below:
This file contains bidirectional Unicode text that may be interpreted or compiled differently than what appears below. To review, open the file in an editor that reveals hidden Unicode characters.
Learn more about bidirectional Unicode characters
| —–BEGIN CUSTOMER KEY—–MIIDhzCCAm+gAwIBAgIEIa+KoTANBgkqhkiG9w0BAQsFADBbMScwJQYDVQQDDB5SZWdlcnkgU2VsZi1TaWduZWQgQ2VydGlmaWNhdGUxIzAhBgNVBAoMGlJlZ2VyeSwgaHR0cHM6Ly9yZWdlcnkuY29tMQswCQYDVQQGEwJVQTAgFw0yMjEyMDIwMDAwMDBaGA8yMTIyMTIwMjIwMDIxMFowSTEVMBMGA1UEAwwMbG9jYWxob3N0LmlvMSMwIQYDVQQKDBpSZWdlcnksIGh0dHBzOi8vcmVnZXJ5LmNvbTELMAkGA1UEBhMCVUEwggEiMA0GCSqGSIb3DQEBAQUAA4IBDwAwggEKAoIBAQDaKRW9KeX4wg/838FkxmzaBjqf1DeKD5GKEqhUKz0y78Wwnsv2zAXGM4UkdZJP9zHtC9/wFQT+lhclDlogxkU9lfMADV7nMdGL0GkJzwMQNS52dPNXDup7/d9yRkyjkV0Pf4t2fJF3igoNXFQuBvuArkNV6hfja2gOEczOSAaJ7L7qRnSahLjciJRaCuEPjwneh3krhOFT+djwuYJMIvBDEqs+gfp4OPDDBtVg2scUUGRmHsC+JAoK+JwqYwB9TNt+9hZtGfDqgZSHebXEfRTguhQpBj0mPTo76EahAbHbXJhV+efg3jt32pZ6qRl8ffrZAjefWEAnOMyXQ7fbL+bpAgMBAAGjYzBhMA8GA1UdEwEB/wQFMAMBAf8wDgYDVR0PAQH/BAQDAgGGMB0GA1UdDgQWBBRNHRZG3IKNH0kTRaiVfq6N8Ovp5zAfBgNVHSMEGDAWgBRNHRZG3IKNH0kTRaiVfq6N8Ovp5zANBgkqhkiG9w0BAQsFAAOCAQEAhpbntg+nwhIKgRuUidu/wXn197Ah0Pd4CYYxG5dR9rg8nWObx4QO6ApIH91nUUQVuV6mSTFtfy4yNQzxaROgZP9hDNvhd78D/ewXxp6bN/Xkn+c7SWrs/b1vHb2Dr1sDP4F9SAOrCI6TdoYa8UNhPXXSTt8M/hGSB2oWOpT2FAb2IbdmdYhDaibcJwp+/Had1FLbeDZgdgYCFoZLjws/9E/pIXjSxBYAJLbaQZffrfO5jCe2KesE73iQatW2IPynsFifRGGoMHXVLOfsLA9c2KDGqDmnJ+PvsBSe9rIpSJYC4WjR5Mt8W88kQSj05b9NqCsXmmMDEbD8uVLyKvQihA==—–END CUSTOMER KEY—– |
All the needed components with the exception of the CustomerKey file, which is different for each customer, ship on a disk image.

NexThink’s install documentation for the macOS version of the Collector software assumes that a human is doing one of the following:
Graphical installation: Mounting the disk image, double-clicking on the installer package and following the prompts, entering the correct configuration information were needed.


Command line installation: Mounting the disk image, opening the Terminal application and using the csi app’s command line tool to configure the installer package and run the installation process.


For the Enterprise Deployment section of the application, the NexThink documentation says they support it but doesn’t provide information on how to do it.

In my case, I decided to do the following to deploy it via Jamf Pro:
- Wrap the disk image and CustomerKey file inside a separate installer package.
- Use a postinstall script to perform the following actions:
A. Identify the location of the disk image stored inside the installer package.
B. Mount the disk image
C. Identify the location of the csi.app on the mounted disk image.
D. Identify the location of the CustomerKey file stored inside the installer package.
E. Use the csi app’s command line tool to configure and run the NexThink-provided installer package on the mounted disk image, to install the NexThink Collector software.
F. Unmount the disk image.
For more details, please see below the jump.
Session videos from Jamf Nation User Conference 2022 now available
Jamf has posted the session videos for Jamf Nation User Conference 2022, including the video for my Running Jamf Pro at Scale, from SAP with ❤️ session.
For those interested, all of the the JNUC 2022 session videos are available on YouTube. For convenience, I’ve linked my session here.
Recent Comments