User-initiated computer enrollment now using MDM profile enrollment in Jamf Pro 10.3
One of the changes introduced in Jamf Pro 10.3 is that user-initiated computer enrollment now has two modes:
- macOS High Sierra: Uses an MDM profile to enroll the Mac, with the Jamf Pro agent being installed once MDM enrollment is complete.
- macOS Sierra and earlier: Uses a QuickAdd installer package to enroll the Mac, with MDM enrollment and installation of the Jamf Pro agent being handled by the QuickAdd package.
Why the difference?
Using the MDM enrollment method on macOS High Sierra will automatically enable User Approved MDM, which is necessary for full management privileges on the Mac in question. The reason is that since the user is installing the MDM profile, the user is also logically approving the MDM management and satisfying Apple’s conditions for enabling User Approved MDM.
For more details, please see below the jump.
The installation of the MDM profile can be configured two ways:
- The installation of a CA certificate, followed by an MDM profile
- The installation of the MDM profile only.
The difference between the two depends on if your Jamf Pro server is using a trusted third-party SSL certificate, either directly on your Jamf Pro server or on a load balancer which is handling SSL termination for the Jamf Pro server.
If one of the two conditions mentioned above applies, where your Jamf Pro server is using a trusted third-party SSL certificate, you can set the CA certificate installation to be skipped using the following procedure:
1. Log into your Jamf Pro server using an account with administrator privileges.
2. Go to the management settings
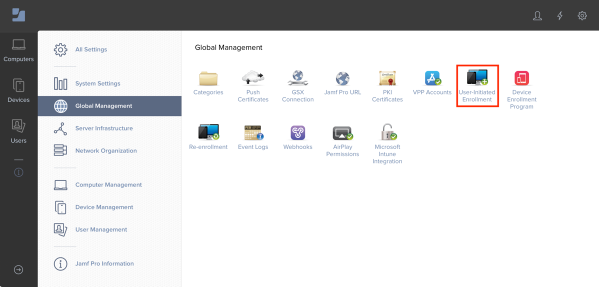
3. Click on Global Management
4. Select User-Initiated Enrollment

5. Check the Skip certificate installation during enrollment checkbox.

If you’re not sure, leave the Skip certificate installation during enrollment checkbox unchecked. This will allow the installation of the CA certificate before the installation of the MDM profile.

Enrolling by installing a CA certificate, followed by an MDM profile
Pre-requisites
- macOS 10.13.0 or later
1. Go to https://server.name.here:8443/enroll
2. Enter your username and password, then click the Login button.

3. Click the Enroll button.

4. When notified that you’ll need to install the CA certificate, click the Continue button.

5. When prompted to install the CA certificate, click the Continue button.

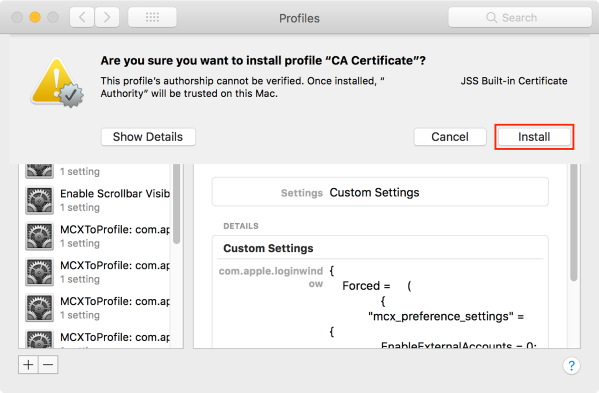
6. When asked to verify that you want to install the CA certificate, click the Install button.

A new CA Certificate profile should now appear in the User Profiles section of the Profiles preference pane.

7. When prompted to enroll the MDM profile, click the Continue button.

8. When prompted to install the Profile Service Enrollment profile, click the Install button.

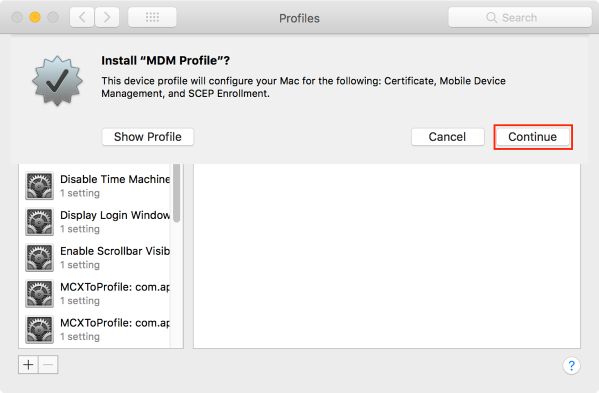
9. When prompted to configure your Mac using a certificate, mobile device management and SCEP enrollment, click the Continue button.

10. When prompted to enroll the MDM profile, click the Install button.

11. When prompted for admin credentials, provide the username and password of a user with admin credentials.

The profile will install and should appear as verified.


The enrollment page should report that enrollment is complete.

Enrolling by installing an MDM profile
Pre-requisites
- macOS 10.13.0 or later
1. Go to https://server.name.here:8443/enroll
2. Enter your username and password, then click the Login button.

3. Click the Enroll button.

4. When prompted to enroll the MDM profile, click the Continue button.

5. When prompted to install the Profile Service Enrollment profile, click the Install button.

6. When prompted to configure your Mac using a certificate, mobile device management and SCEP enrollment, click the Continue button.

7. When prompted to enroll the MDM profile, click the Install button.

8. When prompted for admin credentials, provide the username and password of a user with admin credentials.

The profile will install and should appear as verified.


The enrollment page should report that enrollment is complete.

Is there anyway to accept enrollment via ARD?
Only if you remote into the computer using ARD, opening the browser on the remote computer, then following the enrollment steps listed above.
Does this install the jamf binary for running policy?