FileVault 2 Institutional Recovery Keys – Creation, Deployment and Use
As part of Apple’s FileVault 2 encryption, Apple has provided for the use of recovery keys. These keys are a backup method to unlock FileVault 2’s encryption in the event that the usual method of logging using a user’s account password is not available.
There are two main types of recovery keys available:
1. Personal recovery keys – These are recovery keys that are automatically generated at the time of encryption. These keys are generated as an alphanumeric string and are unique to the machine being encrypted. In the event that an encrypted Mac is decrypted and then re-encrypted, the existing personal recovery key would be invalidated and a new personal recovery key would be created as part of the encryption process.
2. Institutional recovery keys – These are pre-made recovery keys that can be installed on a system prior to encryption and most often used by a company, school or institution to have one common recovery key that can unlock their managed encrypted systems.
Institutional keys are not automatically created and will need to be properly generated before they can be used. For more information on institutional recovery keys, see below the jump.
To help understand why institutional recovery keys work the way they do, here’s some historical background on institutional recovery keys and how they came to be used in FileVault 2.
FileVault 1 and the FileVaultMaster.keychain file
The sole part of Apple’s FileVault 1 (also known as legacy FileVault) that was carried over into FileVault 2 was the ability to use the FileVaultMaster.keychain file (stored in /Library/Keychains) as an institutional recovery key.
In FileVault 1 deployments, you were asked to set a Master Password when turning on FileVault 1’s encryption. When you set the Master Password, the FileVault 1 encryption process set the password that was entered as the password on the /Library/Keychains/FileVaultMaster.keychain file. In turn, the FileVaultMaster.keychain file contained two keys used for PKI certificate-based authentication (one public key and one private key). When the public and private keys are both stored in one keychain, the keychain can be used to unlock your FileVault 1-encrypted home folder in the event that the password to open it was lost or forgotten. The Master Password only unlocked the keychain and allowed the system to access those two PKI keys. This is the reason why you needed to set the Master Password before encrypting and why it was also important to use the same FileVaultMaster.keychain file across the machines where you wanted to make sure that the same recovery key was being used.
If you were deploying the same recovery key for your FileVault-encrypted Macs, Apple consistently recommended that you go into the FileVaultMaster.keychain file, remove the PKI private key, put the private key somewhere secure and deploy the FileVaultMaster.keychain file with only the public key inside. The reason was that, in the event that the password to the FileVaultMaster.keychain file was compromised, all the compromiser got was one half of the keypair (the public key half.) The private key would not be on the machine and thus not available to compromise the FileVault 1-encrypted homes on the machine. However, FileVault 1 would work with both the public and private keys stored in /Library/Keychains/FileVaultMaster.keychain.
In FileVault 2, Apple changed removing the private key from being a suggested best practice to being a technical requirement. If you want to use an institutional recovery key, your FileVaultMaster.keychain file needs to have just the public key in it. If both public and private keys are stored in the /Library/Keychains/FileVaultMaster.keychain file on a Mac, FileVault 2 will ignore the keychain and not use it as an institutional recovery key. In this case, enabling FileVault 2 encryption will automatically generate a personal recovery key.
Creating an Institutional Recovery Key
If you want to use an institutional recovery key on FileVault 2 encrypted Macs, you will need to create and configure a FileVaultMaster keychain. Apple has provided a way to create this keychain by using the security command’s create-filevaultmaster-keychain function. To create a FileVaultMaster.keychain file, run the following command:
security create-filevaultmaster-keychain /path/to/FileVaultMaster.keychain
You’ll be prompted for a password for the keychain. When provided, the keychain will be created and will contain both the private and public keys needed for recovering a FileVault 2-encrypted drive that uses this institutional recovery key. Make copies of the keychain and store them in a safe place. Also make sure to securely store copies of the password you used to create the keychain.

If you want to create the FileVaultMaster keychain in its proper place, run the security command with root privileges and use /Library/Keychains for the destination path.

Once you’ve made your copies, make another copy and remove the private key from that copy of the keychain. Once the private key is removed, the FileVaultMaster.keychain file is ready to be used for encrypting Macs with FileVault 2 with the institutional recovery key.
It doesn’t appear that the security main page includes information about the create-filevaultmaster-keychain function, but you can see what it does by running the security help command in Terminal and checking at the bottom of the list that appears.

A way to modify /Library/Keychains/FileVaultMaster.keychain so that it only has the public key inside would be to do the following:
1. Create the FileVaultMaster.keychain file using the security command.
2. Next, make several copies of the FileVaultMaster.keychain file that you just created and store the copies separately in secure locations. A locked safe would be a good place, or in an encrypted disk image that is on an access-restricted file share.
3. Next, unlock the newly-created FileVaultMaster.keychain file by running the following command and entering the keychain’s password when prompted for the password:
security unlock-keychain /Library/Keychains/FileVaultMaster.keychain

Note: The FileVaultMaster keychain will need to be unlocked from the command-line as the keychain will not unlock in Keychain Access by clicking on the lock.
4. If it succeeds, you’ll get the next system prompt. If not, get another copy of the FileVaultMaster.keychain file and try again. A FileVaultMaster.keychain file with an unknown password should not be used because there is no way to use it for recovery purposes without first knowing the keychain’s current password.
5. Once you’ve unlocked the FileVaultMaster.keychain file, open the Keychain Access application from /Applications/Utilities/.

6. In Keychain Access, go to File: Add Keychain… and add /Library/Keychains/FileVaultMaster.keychain.
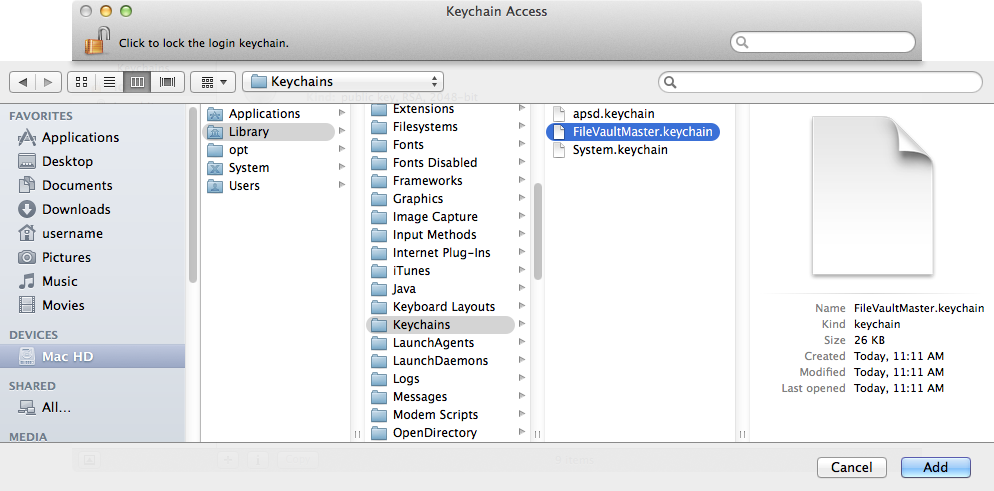
7. Assuming you previously unlocked the FileVaultMaster.keychain file using the security command, it should show up as unlocked in Keychain Access.

8. Go into the FileVaultMaster keychain and remove the private key. (It should be called FileVault Master Password Key and its kind should be listed as private key.)

9. Relock the FileVaultMaster keychain

10. Copy the modified FileVaultMaster.keychain file (now with only the public key inside) to the /Library/Keychains directory of the Macs you want to encrypt with FileVault 2. For ease of deployment, you can package the FileVaultMaster.keychain file into an installer package. That installer package can then be deployed ahead of encryption to multiple machines using the system management tools used in your environment.
When deployed to /Library/Keychains on the Macs you want to encrypt with FileVault 2, the FileVaultMaster.keychain file should have the following permissions set:
Owner: root
Permissions: read and write
Group: wheel
Permissions: read only
Everyone
Permissions: read-only
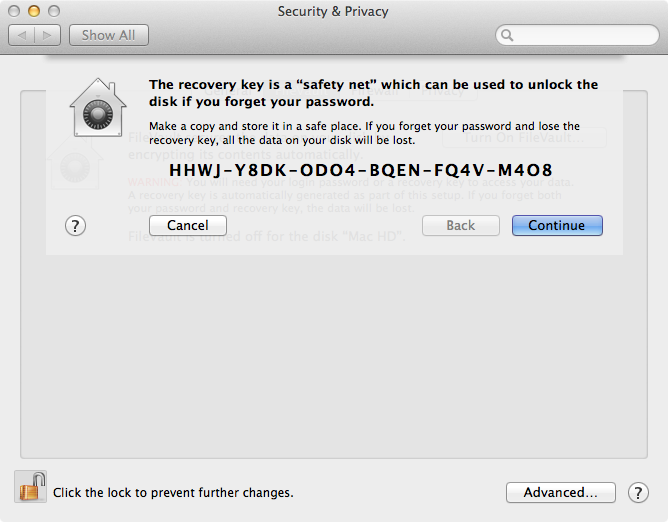
Once the institutional recovery key is deployed to a unencrypted machine, enabling FileVault 2 via System Preferences should produce a message stating that “A recovery key has been set by your company, school or institution” instead of displaying the personal recovery key.


Using FileVaultMaster.keychain to recover your data
At this time, it’s not possible to unlock the encryption at the pre-boot login screen using a recovery key that’s been set with FileVaultMaster.keychain. Here’s an example of how to recover data from a system with an institutional recovery key that has both the private and public keys inside.
In this case, we’re assuming that the machine isn’t booting and you don’t know the password of a user authorized to unlock the encryption:
1. Boot the encrypted Mac from a Recovery HD partition or from Apple’s Internet Recovery.
2. Open Terminal.
3. Run the following command to get the Logical Volume UUID of the Mac’s encrypted partition:
diskutil corestorage list
4. With the UUID information acquired, run the following command to unlock the FileVaultMaster keychain:
security unlock-keychain /path/to/FileVaultMaster.keychain
5. Enter the keychain’s password when prompted to unlock the keychain.
6. Run the following command to unlock the encrypted Core Storage volume on the encrypted Mac, substituting the appropriate Logical Volume UUID for UUID_here:
diskutil corestorage unlockVolume UUID_here -recoveryKeychain /path/to/FileVaultMaster.keychain
7. You should then see output similar to the following.
Started CoreStorage operation
Logical Volume successfully unlocked
Logical Volume successfully attached as disk4
Logical Volume successfully mounted as /Volumes/Macintosh HD
Core Storage disk: disk4
If you open the Disk Utility application after this point, you should see the encrypted Mac’s hard drive as being mounted. At this point, with the disk unlocked and mounted, you should be able to recover your data using whatever tools you prefer.
Once you’ve unlocked the disk, you can also then decrypt the encrypted volume by using the FileVaultMaster.keychain file to authorize it.
To decrypt, run the following command on the encrypted Mac, substituting the appropriate Logical Volume UUID for UUID_here:
diskutil corestorage revert UUID_here –recoveryKeychain /path/to/FileVaultMaster.keychain
Note: A FileVault 2-encrypted drive must be unlocked before it can be decrypted.
When decrypting while booted from the Recovery HD partition on 10.9.x, there is a decryption-related bug to be aware of. See this post for more details.
Institutional recovery keys and fdesetup
fdesetup is a multifunctional tool for enabling and managing FileVault 2 in Mavericks. When used with an institutional recovery key, fdesetup can perform the following functions:
- Enable FileVault 2 encryption
- Support multiple recovery keys for FileVault 2, giving Mac admins more options for handling recovery situations.
- Rotate or remove both personal and institutional recovery keys on an as-needed basis.
Enabling FileVault 2 encryption with fdesetup using an institutional recovery key
In OS X 10.9.x, you are able to use the institutional recovery key with the fdesetup command line tool for managing FileVault 2 encryption to perform various actions. Among its various functions, fdesetup provides the ability to encrypt using the alphanumeric personal recovery key, an institutional recovery key using /Library/Keychains/FileVaultMaster.keychain, or both kinds of recovery key at the same time.
fdesetup will provide the alphanumeric personal recovery key by default. To use the institutional recovery key, the -keychain flag needs to be used when enabling encryption:
sudo fdesetup enable –keychain
The alphanumeric personal recovery key is displayed, but the encryption will also use the /Library/Keychains/FileVaultMaster.keychain file as an institutional recovery key. In case recovery is needed, either recovery key will work to unlock or decrypt the encrypted drive.

If you want to specify that only the FileVaultMaster.keychain institutional recovery key be used, both the -keychain and -norecoverykey flags need to be used when enabling encryption:
sudo fdesetup enable -keychain –norecoverykey

fdesetup is also capable of creating an institutional recovery key, using the -certificate flag to import an existing FileVault 2 public key. Once imported, fdesetup will automatically create a FileVaultMaster.keychain file to store the public key and save the keychain to /Library/Keychains.
The public key will need to be available as a DER encoded .cer certificate file. This certificate file can be created using the following procedure:
1. Access the FileVaultMaster keychain via the Keychain Access application.
2. Select the public key in the FileVaultMaster keychain.
3. In Keychain Access, select the File menu.
4. Under the File menu, select Export Items…

5. Set the File Format: export option to be Certificate (.cer)

6. Name and save the .cer file to a convenient location.
Once the certificate is available, the following command can be run to enable FileVault 2, automatically create the institutional recovery key with the supplied public key and store it as /Library/Keychains/FileVaultMaster.keychain:
sudo fdesetup enable -certificate /path/to/filename.cer

To specify that only the FileVaultMaster.keychain institutional recovery key be used, add the -norecoverykey flag to the command:
sudo fdesetup enable -certificate /path/to/filename.cer -norecoverykey

It is also possible to include the public key data in a plist file, which allows the use of a plist to set up the institutional recovery key. The plist needs to follow the format below:
<?xml version="1.0" encoding="UTF-8"?>
<!DOCTYPE plist PUBLIC "-//Apple//DTD PLIST 1.0//EN" "http://www.apple.com/DTDs/PropertyList-1.0.dtd">
<plist version="1.0">
<dict>
<key>Username</key>
<string>username</string>
<key>Password</key>
<string>password</string>
<key>AdditionalUsers</key>
<array>
 <dict>
  <key>Username</key>
  <string>username</string>
  <key>Password</key>
  <string>password</string>
 </dict>
 <dict>
  <key>Username</key>
  <string>username</string>
  <key>Password</key>
  <string>password</string>
 </dict>
</array>
<key>Certificate</key>
<data>
(Certificate data goes here…)
</data>
</dict>
</plist>
Using a DER encoded certificate file that contains the public key, the public key data for the plist can be obtained using the base64 tool by using the following command:
base64 /path/to/filename.cer > /path/to/filename.txt
At this point, you would copy the data string contained in the text file and place it into the Certificate <data></data> value area of the plist file. You would store either the password of an existing FileVault 2-enabled user or (if available) an existing personal recovery key in the Password key in the plist.

Managing institutional recovery keys with fdesetup
fdesetup in Mavericks adds the new ability to change, add and remove institutional recovery keys. This gives Mac admins much greater ability to manage recovery keys, including the capability to quickly update or remove compromised institutional recovery keys in the event of a data breach or other problem.
You can add or change recovery keys using fdesetup changerecovery. To change to a new institutional recovery key, you will need to have the new public key available. If you have a new institutional public key available as a DER encoded certificate file, you can run the following command to replace the current institutional key:
sudo fdesetup changerecovery -institutional -certificate /path/to/filename.cer
If an institutional keychain is being used on this Mac, you will see a message that an existing FileVault Master keychain was found and moved. The reason for this is that, as part of this process, the current institutional key’s /Library/Keychains/FileVaultMaster.keychain file is replaced with a new /Library/Keychains/FileVaultMaster.keychain file that includes the new institutional recovery key’s public key.

While the former institutional key’s /Library/Keychains/FileVaultMaster.keychain was moved and not deleted, the former institutional recovery key will no longer work.
For those who want to automate the process, fdesetup also supports importing a properly formatted plist via a standard input stream (stdin). The plist needs to follow the format below:
<?xml version="1.0" encoding="UTF-8"?>
<!DOCTYPE plist PUBLIC "-//Apple//DTD PLIST 1.0//EN" "http://www.apple.com/DTDs/PropertyList-1.0.dtd">
<plist version="1.0">
<dict>
<key>Password</key>
<string>password</string>
<key>Certificate</key>
<data>
(Certificate data goes here…)
</data>
</dict>
</plist>

You can also use the current institutional recovery key to authenticate the change to the new institutional key. If you have a keychain file available containing the private key of the current institutional key, you can run the following command to replace the current institutional key:
sudo fdesetup changerecovery -institutional -keychain -certificate /path/to/filename.cer -key /path/to/filename.keychain
You’ll be prompted for the keychain’s password. Once entered, the current institutional key will be replaced with the new one.

In the event that the Mac in question does not have an institutional recovery key, running the commands above (with the exception of using the current institutional key for authentication) will add an institutional recovery key instead of changing an existing one.
Removing institutional recovery keys
You can remove recovery keys using fdesetup removerecovery. To remove institutional recovery keys, run the following command:
sudo fdesetup removerecovery -institutional
You’ll be prompted for the password of an existing FileVault 2-enabled user. Once entered, the institutional recovery key will be removed from the system and will no longer work.

The removal of the institutional key can also be automated using a properly formatted plist via a standard input stream (stdin). The plist is the same as the one used for removing the personal key.
Once the plist has been set up and properly formatted, run the following command to remove the institutional recovery key and reference the password or recovery key in the plist file:
sudo fdesetup removerecovery -institutional -inputplist < /path/to/filename.plist

You can also use the recovery key associated with an institutional key to authenticate the removal of that institutional key. Once authenticated, the institutional key is removed from the system and will no longer work.
If you have a keychain file containing the private key for the current institutional key available, you can run the following command to remove the current institutional key:
sudo fdesetup removerecovery -institutional -key /path/to/filename.keychain

It is possible to use fdesetup removerecovery to remove one or both recovery keys on a particular Mac. Once the recovery keys are removed, the only way to unlock the FileVault 2 encryption is by using the password of an enabled account. That said, you can use fdesetup changerecovery to add one or both types of recovery keys back to the encrypted Mac.
Referencing an institutional recovery key in a fdesetup plist file
As part of the man page for fdesetup in OS X 10.9.x, Apple provides a sample plist file as a guide for those who want to import authentication credentials as part of running commands with fdesetup. As part of the plist, there are two plist keys that reference using a keychain that contains the private key for an institutional recovery key:
KeychainPath
KeychainPassword

For KeychainPath, you will need to provide the file path to the keychain as the plist value. For KeychainPassword, you will need to provide the password that unlocks that keychain.
For example, if you put the keychain into the /tmp directory, you would reference /tmp/filename.keychain as the KeychainPath plist value. If the password for unlocking that keychain is seKritPassword, you would reference seKritPassword as the KeychainPassword plist value. In my testing, it appears that you can leverage the KeychainPath and KeychainPassword plist keys with the following fdesetup commands.
fdesetup changerecovery
![]()
![]()
fdesetup removerecovery
![]()
![]()
If using the current institutional key to authenticate, the plist needs to follow the format shown below:
<?xml version="1.0" encoding="UTF-8"?>
<!DOCTYPE plist PUBLIC "-//Apple//DTD PLIST 1.0//EN" "http://www.apple.com/DTDs/PropertyList-1.0.dtd">
<plist version="1.0">
<dict>
<key>KeychainPath</key>
<string>/path/to/filename.keychain</string>
<key>KeychainPassword</key>
<string>password</string>
</dict>
</plist>

If you are using the current institutional key to authenticate a change to a new institutional recovery key, you can also embed the public key of the new institutional recovery key in the plist. In that case, the plist needs to follow the format shown below:
<?xml version="1.0" encoding="UTF-8"?>
<!DOCTYPE plist PUBLIC "-//Apple//DTD PLIST 1.0//EN" "http://www.apple.com/DTDs/PropertyList-1.0.dtd">
<plist version="1.0">
<dict>
<key>KeychainPath</key>
<string>/path/to/filename.keychain</string>
<key>KeychainPassword</key>
<string>password</string>
<key>Certificate</key>
<data>
(Certificate data goes here.)
</data>
</dict>
</plist>

Recovery key reporting
To go along with the ability to manage recovery keys, fdesetup enables Mac admins to detect which types of recovery keys are in use on a particular Mac. To check if an institutional recovery key is in use, run the following command:
sudo fdesetup hasinstitutionalrecoverykey
If FileVault 2 is using an institutional recovery key, this command will return true. Otherwise it will return false.

Security considerations
Institutional recovery keys have a weakness from the cryptographic point of view, which is that the concept inherently uses one private and public key pair to unlock the encryption of more than one encrypted volume. A malicious party who compromises the private key of an institutional recovery key means that all Macs encrypted using that institutional recovery key are vulnerable. In order to maintain their encryption protection, those Macs must have their institutional key changed to a new one.
That said, Apple has taken the following steps in FileVault 2 as of OS X 10.9.x to mitigate the possible vulnerability of a compromised private key:
1. Making it a technical requirement that the FileVaultMaster.keychain file only contain the public key when deployed to Macs that will be using the institutional recovery key for FileVault 2 encryption.
The public key is not sensitive information and was designed as such. You can post the contents of a public key to a public billboard without compromising the security of the encrypted volume.
2. Providing a way to replace a compromised recovery key.
Before OS X 10.9.x, you would need to decrypt an encrypted Mac before being able to change an existing institutional recovery key. In 10.9.x, fdesetup can be leveraged to assist in this situation in the following ways:
- Changing the compromised institutional key to a new one with fdesetup‘s changerecovery function
- End the use of an institutional key with fdesetup‘s removerecovery function
Conclusion
Every shop must consider its own security requirements and make its own judgments based on that. If you are thinking of using an institutional recovery key for your FileVault 2 deployment, hopefully the information provided here provides you with the needed knowledge to get you started.
Leave a comment
Recent Comments
| Ben LeRoy on Losing a giant | |
| Peter-Erik on Downloading installer packages… | |
| nathanhaggard on Losing a giant | |
| andras0602 on Disabling login window clock d… | |
| Jeff on Losing a giant |

Hi,
I’ve been using this method to create institutional recovery keys for deployment our 10.7-10.9 target systems. This approach has worked well in my environment for the past few years; we’re a DeployStudio shop and typically include the FileVaultMaster.keychain (prepared for deployment with the private key removed) in a package payload that’s delivered to our target systems as part of a DeployStudio workflow.
In testing on 10.10 & 10.10.1 targets with the institutional key in place (at /Library/Keychains), I’ve found I’m unable to enable FileVault via System Preferences. I do see the expected message indicating that ‘A recovery key has been set by your company, school, or institution’ but after clicking ‘Continue’ am not given the option to choose users to unlock the disk. Instead, I see one of the following three “FileVault Failed” errors: “Unable to create a FileVault context”, “Boot file not written”, or “The given disk is in use by a driver”.
I first suspected a problem with the recovery partition restored during the DeployStudio workflow, but I think I’ve ruled out this possibility: 1) I found that by removing the FileVaultMaster.keychain from /Library/Keychains on a DeployStudio-imaged system, I’m once again able to enable FileVault normally via System Preferences; and 2) I can reproduce this issue by deploying a prepared FileVaultMaster.keychain to a target system on which I’ve installed Yosemite using the stock installer from the MAS.
Are you aware of such a problem with institutional keys in 10.10?
Thanks,
-Bill
I am also experiencing this issue. Very upsetting.
OK. I think I have this working. This is how it went down for me…
I followed the directions in the Apple HT202385 document, except I couldn’t unlock /Library/Keychains/FileVaultMaster.keychain in order to delete the private key, so I used the the copy I’d made earlier, duplicated the file, unlocked and removed the FileVault Master Password Key.
On the newly installed Mac I copied the FileVaultMaster.keychain to the /Library/Keychains directory as described in the document.
I created a new admin level user and logged into this account, then I went to System Preferences, Security & Privacy and pressed the Turn On FileVault button. The message appears about the recovery key being set, click the Continue button.
Now here is the thing… it looks like nothing is happening, if you click to enable FileVault again you get an error message about the given disk being in use or unable to create FileVault context or whatever. The trick for me was, once you click the Continue button to enable FileVault, just leave the Mac alone, it doesn’t look like anything is happening, but after a while the Mac restarts and the encryption process begins.
However, it all seems a little unstable, I’ve just tried repeating the above steps and the process seems to be working, but when the Mac restarted it showed a kernel panic screen. On restarting again all appears to be working, but can the process be trusted?
The apparent instability & inconsistency is troubling. I’ve also seen the behavior described by Renegade Pig (at times, no error message appears until the second time I click Continue).
I’ve also seen a different scenario where the system hangs for a few seconds after clicking Continue to enable FileVault, then seems to reboot normally (without presenting one of the three error messages described in my original post), but still without having presented the pane to select users to unlock the disk.
After reboot, System Preferences reports that encryption is in progress, but a bit more testing (using diskutil to compare the status of the recovery and boot volumes before and after trying to enable FileVault) suggests that the boot volume is somehow becoming damaged when I try to enable FileVault through System Preferences (when FileVaultMaster.keychain is in place).
Before trying to enable FileVault: diskutil verifyVolume /Volumes/OS\ X\ Base\ System
The volume OS X Base System appears to be OK
File system check exit code is 0
Finished file system verification on disk1s2 OS X Base System
Before trying to enable FileVault: diskutil verifyVolume /Volumes/Macintosh\ HD
The volume Macintosh HD appears to be OK
File system check exit code is 0
Finished file system verification on disk0s2 Macintosh HD
After trying to enable FileVault: diskutil verifyVolume /Volumes/OS\ X\ Base\ System
The volume OS X Base System appears to be OK
File system check exit code is 0
Finished file system verification on disk1s2 OS X Base System
After trying to enable FileVault: diskutil verifyVolume /Volumes/Macintosh\ HD
Volume header needs minor repair
The volume Macintosh HD was found corrupt and needs to be repaired
File system check exit code is 8
Error: -69845: File system verify or repair failed
Underlying error: 8: POSIX reports: Exec format error
I can repair Macintosh HD, but it apparently becomes damaged again on subsequent attempts to enable FileVault.
I had similar issues with the delay after clicking Continue, and errors when I try to click again (or restarting and getting the line-through-circle screen on bootup) when I tried to use an institutional key created with an earlier version of OS X to encrypt a system running Yosemite.
Rather than using the GUI “Set Master Password…” method as described in HT202385, I used Rich’s instructions above to create the FileVaultMaster.keychain using Terminal (I was able to unlock the keychain and delete the private key). I then copied the modified keychain to a Mac with a fresh install of Yosemite, and when I clicked Continue, the Mac reboots nearly right away.
I don’t know if it’s using Terminal to create the keychain, or (more likely in my opinion) if it was creating a brand new keychain in Yosemite rather than try to use an existing one, but it’s running fairly smoothly now.
The Yosemite issue appears to be a System Preferences bug as far as I can tell. I’ve put up a post about it, available from here:
I’ve filed a bug report about it. For those interested in duping it, it’s bug ID 19124344.
For those interested in the details, I’ve also posted the bug report to Open Radar:
http://openradar.appspot.com/19124344
Hello. I’m researching the use of creating an Institutional Keychain for a College. We are currently setting up Macs for new faculty/staff through the use of some AppleScripts that configure them as required and bind the Macs to the Active Directory. We don’t have enough personnel to maintain something like a DeployStudio server, (we have to also maintain WSUS and portions of a Windows AD). The admins set up encryption after configuration, save the key in a safe area, and then “enable” the faculty/staff user after that person first logs in.
So far, this means we need to shadow the user for two events. First, their Mac needs to be wired into the network to get the network credentials for their account from the AD. Once they have that, the account is set to be mobile by default, and they are almost ready. Second, we then need to make sure we go into the Security panel and enable their account for encryption. I would love it if the second part happened automatically.
What stops me from setting up an institutional key is the potential for a single point of failure as reported above.
We haven’t even needed a single instance of a key for encryption recovery yet, either. We have had Macs that have failed or needed to be recovered, but in each case, so long as the local admin account itself has access to the disk, it has been able to do what needs to be done. As long as we can regularly change that account’s password with Endpoint Management, we are addressing the main vulnerability to user laptops, as we see it, that their machines are not left unencrypted.
I would love to be able to set up a Mac and hand it off to a new user much as we do with Windows PCs that get encrypted with BitLocker. However, the easiest way I have found to do it is to encrypt the machine before with the local admin account, copy that key down and store it on our server in a simple list only IT personnel have access to.
@d.James – Have you ever found a solution to this? Also unable to change admin account password on 10.11 and have it sync with FV so same password is used.
This post has made it much easier to complete our FileVault deployment. Decryption using an institutional recovery worked great! Thanks for all of your time and effort on testing and documenting this.
Is it possible to decrypt an external drive with the “global institutional recovery key” ( encrypted with the Finder encrypt functionality)?
“FileVault Failed” errors: “Unable to create a FileVault context” appears if there is no local admin user that can be shown in the login window. Hidden users won’t work.
Just to clarify: This post implies that on macOS >= Mavericks, one really should be using ‘fedsetup’ to manage recovery keys. And not the ‘security’ command
oops, that was supposed to end in a question mark “?” — as in, I was asking a question!
Can you explain the personal recovery key from an mdm profile/payload perspective. As to how the redirect server should be designed and such
I have a question. If you are rolling out institutional keychain recovery for an organization, and want to use multiple recovery keychains, how can you identify which keychain to use for recovery when you receive a system and need to decrypt.
For example, let us say for a large organization you are rolling out 10,000 macs and want to use 100 different institutional keychains to encrypt. Later when you receive an encrypted notebook that you need to decrypt, you have to try up to 100 different keychains to find the one that was used to encrypt that notebook.
Is there a way to identify with an encrypted notebook which keychain was used to encrypt so that you can find the correct decryption keychain without trying all 100?
Thanks.
Yes. Please see this post: https://derflounder.wordpress.com/2016/04/10/identifying-filevault-2-institutional-recovery-keys-on-os-x-el-capitan/
I never intentionally installed an institutional recovery key. after upgrading to macos high sierra beta (im on the newest beta now), an institutional recovery key seems to be active: when i try encrypting, i get the message that an institutional recovery key has been installed.
i am not able to delete this key. all suggested methods fail. when i copy FileVaultMaster.keychain to the desktop, it appears empty.
Good job. that’s very helpful!
Great walkthrough, thank you!
I have also watched the video from Macaduk 2018.
I have, however, run into one issue: I have created the keychain, filevaulted with the institutional key.
I can boot into recovery mode, open the keychain from a usb drive and run the unlockVolume command, and the volume is readable. And I can, of course, ditto files out, but I can’t remove encryption. Isn’t there a way to unencrypt the drive? (apfs drive, 10.13.4) I have tried the revert but it doesn’t work.
Can you provide any helping hints?
TIA,
Peter
Does this still work for High Sierra?
If I have Macs with Personal Recovery Key set, instead of decrypting could i do the following?
Copy the keychain with no private key to the new mac and place it here: /Library/Keychain
sudo fdesetup changerecovery -institutional -keychain /Library/Keychain/FileVaultMaster.keychain
Would this work? Or do I need the Certificate instead?