Emulating specific Apple models in VMWare Fusion VMs
Once you have a VM built, you may want to edit it to emulate a specific Mac model. One reason for doing this would be to test model-specific updates from Apple’s Software Update.
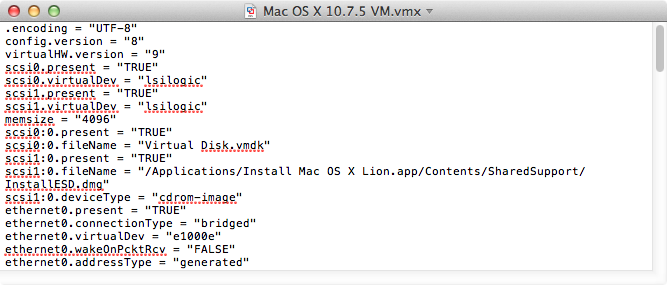
To set your VM to report itself as a specific Mac model, you would need to add the hw.model flag to your VM’s .vmx configuration settings. See below the jump for how to do this.
Note: Always test first on a copy of your VM
1. Launch VMWare Fusion
2. Verify that the virtual machine you want to edit is completely shut down. (Do not edit a suspended VM.)
3. In VMware Fusion, go to the Window menu and select Virtual Machine Library.
4. Select the VM you want.
5. Hold down the Option key on your keyboard and right-click the virtual machine.
6. Select Open Config File in Editor. This will open up the VM’s .vmx configuration file for editing.

7. Locate the model identifier of the Mac you want to emulate.
Note: You can find this by opening System Profiler on the model you want to emulate, selecting Hardware and looking for Model Identifier on the right side of the window.
8. In the .vmx editing window, add the following line:
hw.model = "model_here"
9. Once your edits are finished, go up to the File menu and select Save to save your changes.
Here’s an example of how to set a VM to identify itself as a 2011 MacBook Pro.
1. Launch System Profiler on a 2011 MacBook Pro and check the model identifier. In this case, the model identifier is MacBookPro8,1

2. Launch VMWare Fusion
3. In VMware Fusion, go to the Window menu and select Virtual Machine Library.
4. Select the VM you want.
5. Hold the Option key on your keyboard and right-click the VM.
6. Select Open Config File in Editor. This will open up the VM’s .vmx configuration file for editing.
7. In the .vmx editing window, add the following line:
hw.model = "MacBookPro8,1"

8. Save changes.
When you launch the VM, it should now identify itself as a MacBook Pro in System Profiler.

Hat tip: Pepijn Bruienne and Tim Sutton for their assistance with this.
Leave a comment
Recent Comments
| Ben LeRoy on Losing a giant | |
| Peter-Erik on Downloading installer packages… | |
| nathanhaggard on Losing a giant | |
| andras0602 on Disabling login window clock d… | |
| Jeff on Losing a giant |

What effect does this have on the VM in a practical sense?
Jurgen,
The VM will now report that it is that specific Mac model when queried for model-specific information. For example, it would now receive any model-specific updates via Software Update and would be able to pull down that model’s InstallESD from Apple’s servers when reinstalling the OS from Recovery HD.
Ah, handy! Is it possible to change serial and hardware uuid in a similar fashion? I’m still seeing that a service such as Caching with OS X Server won’t properly register for push, suspect its related to huuid or serial, as it still doesn’t register even if you change the model identifier. Not fooling Apple enough 😉
You can change the hardware UUID. See this KBase article:
http://kb.vmware.com/kb/1541
I don’t know about the serial number.
I think that hardware UUID is different from the one thats reported in System Information not?
Is there a way to change a VMs hardware serial number in Fusion as well? Fusion generates these very long serial numbers that aren’t recognized e.g. by OS X Servers Profile Manager.
@Jens Junge
In the .vmx file enter this, or change in advance settings in vCenter.
SMBIOS.use12CharSerialNumber = “true”
This guide is excellent. I can confirm that it works in 2018 with VMware Fusion 10.1.2 with macOS High Sierra as the host OS, and OS X 10.7 as the guest OS. Many thanks!
This does not work in vmware fusion 10 or 11. I can edit the vmx file but it does not change. Any fix for this ?