Managing the Authorization Database in OS X Mavericks
Prior to OS X Mavericks, the /etc/authorization XML file controlled the rights for many different actions, such as adding a printer, setting up Time Machine or setting DVD region codes. Modifying this file required root access and could be performed with a text editor. The /etc/authorization file could also be modified by using the security command line tool included with OS X, but most chose not to do so because directly editing the file was easier.
With the release of OS X Mavericks, /etc/authorization has been removed in favor of a new authorization database, which is a SQLite database located at /var/db/auth.db. There is also an authorization.plist file located in /System/Library/Security, which is used by the OS as a template for a new /var/db/auth.db database file, in the event that the OS detects on boot that /var/db/auth.db does not exist.
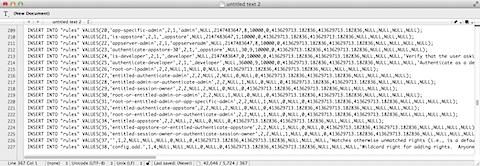
To see what’s in the database, you can export the database to a text file using the following command:
sudo sqlite3 auth.db .dump > /path/to/filename.txt
It’s also possible to open the exported data directly inside text editors that support this option. For example, the following command can be used to export the database and automatically open the exported data in a new TextWrangler document:
sudo sqlite3 auth.db .dump | edit
With the move of authorization rights into a database, the old methods of editing authorization rights with a text editor no longer work. Instead, there are now three possible methods for adding, deleting and changing authorization rights:
- The security command line tool
- Using SQLite commands to modify the database
- Modifying the authorization.plist file located at /System/Library/Security, then removing the existing /var/db/auth.db database
Of these three, the Apple-supported method is to use the security command line tool so I will be focusing on that approach.
The security tool has a command called authorizationdb, which allows for edits to the authorization database. The security authorizationdb command has three options:
- read
- write
- remove
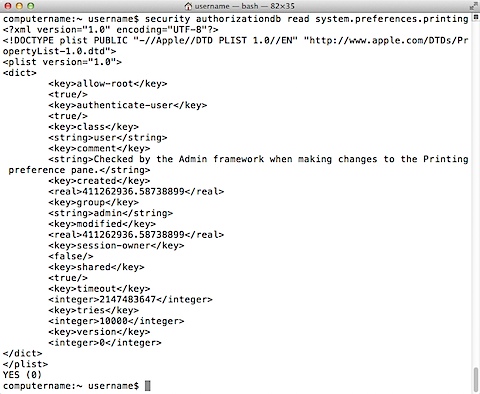
These functions allow for the various rights to be read, added to, changed or deleted. For example, the system.preferences.printing rules can be displayed by running the following command:
security authorizationdb read system.preferences.printing
The rules will be displayed in property list format.
Note: When a security authorizationdb action is successful, it will display a YES status message. If the action is unsuccessful, a NO status message is displayed.
It’s also possible to export the referenced right as a property list file. This export can be performed by running the command below:
security authorizationdb read referenced.rights > /path/to/filename.plist
Making Changes To Authorization Rules
Editing existing rights, or adding new ones, can be accomplished with security authorizationdb write. In turn, the write command has three options:
- allow
- deny
- specific rulename
For example, running the commands below with root privileges will allow all users on this Mac to be able to modify the Startup Disk settings:
security authorizationdb write system.preferences allow
security authorizationdb write system.preferences.startupdisk allow
The first security authorizationdb write command for system.preferences gives all users access to System Preferences itself, which is needed before granting allow rights to other system.preferences.referenced_settings_here rules.
Once the commands above have been run, Startup Disk should now allow modification by all users on the Mac.
As an example of using specific rulenames, running the command below with root privileges will set changes to preferences to require authentication by a user with admin privileges:
security authorizationdb write system.preferences authenticate-admin
However, the best way I’ve found to edit authorization rights is to leverage security authorizationdb‘s ability to export referenced rights to a property list file and import rules from a property list file. This allows granular changes to authorization rules while making sure that the rest of the rule isn’t changed.
A good example of this is the Require an administrator password to access system-wide preferences checkbox found in System Preferences’s Security preferences when the Advanced… button is selected. To set this to be unchecked, you can use the defaults command in combination with the security authorizationdb command together as shown below:
security authorizationdb read system.preferences > /tmp/system.preferences.plist
defaults write /tmp/system.preferences.plist shared -bool true
security authorizationdb write system.preferences < /tmp/system.preferences.plist
The first command exports the current system.preferences rules as a property list to /tmp/system.preferences.plist.
The second command uses defaults to change the existing shared key in /tmp/system.preferences.plist to a boolean value of true.
The third command is run with root privileges, reads the contents of the property list file into the authorization database and then updates the system.preferences rules to use the new value.
The result is that the Require an administrator password to access system-wide preferences checkbox is now unchecked.
PlistBuddy can also be used in place of defaults in a workflow where an exported property list file is being edited. An example of this would be using PlistBuddy and the security authorizationdb command together as shown below to enable the Require an administrator password to access system-wide preferences setting:
security authorizationdb read system.preferences > /tmp/system.preferences.plist
/usr/libexec/PlistBuddy -c "Set :shared false" /tmp/system.preferences.plist
security authorizationdb write system.preferences < /tmp/system.preferences.plist
The first command exports the current system.preferences rules as a property list to /tmp/system.preferences.plist.
The second command uses PlistBuddy to change the existing shared key in /tmp/system.preferences.plist to a boolean value of false.
The third command is run with root privileges, reads the contents of the property list into the authorization database and updates the system.preferences rules to use the new value.
The result is that the Require an administrator password to access system-wide preferences checkbox is now checked.
Testing Authorization Rule Changes
When testing changes to the authorization rules, I strongly recommend using a virtual machine or something other than a production machine. Incorrectly editing the authorization database may result in functions working unpredictably or stop working at all. My additional recommendation would be to use the following workflow to make changes to rules:
- Use security authorizationdb read referenced.rights > /path/to/referenced.rights.plist to export a property list file containing the rule.
- Modify /path/to/referenced.rights.plist using the property list editor that works best for your needs.
- Use security authorizationdb write referenced.rights < /path/to/referenced.rights.plist to write the needed changes back to the database.
That said, Mavericks offers a way to reset the authorization rules that was not available on previous versions of OS X. In the event that problems occur, it is possible to boot the machine to the Mac’s recovery partition and use the command line to remove the auth.db database files that reside in /var/db/ on the Mac’s boot drive. At next reboot, the OS will detect that /var/db/auth.db does not exist and create a new /var/db/auth.db, using /System/Library/Security/authorization.plist as a template.
As always, change is hard, especially when the changes aren’t well documented by Apple. However, using Apple’s security authorizationdb command to edit the database should help Mac admins in the long run by reducing the possibility of problems due to incorrect formatting or other errors. security authorizationdb‘s ability to both export and import property list files containing rule information also helps Mac admins by allowing granular changes to be made to individual rules without worrying about adversely affecting the other rules’ ability to manage the Mac.
In my opinion, this change by Apple provides short-term pain and long-term gain to Mac admins by making it easier to manage authorization rules both in Mavericks and in future versions of OS X.
For more information on working with the authorization database, I recommend checking out the links below:
Authorization Rights and Mavericks
Authorisation Rights reference
Modifying the OS X Mavericks Authorization Database


Might be worth pointing out that using the `security` command to alter the authorization database also works for older versions of OS X. In other words, we should have been doing it this way all along!
Isn’t this stuff supposed to get more simple? Stuff just keeps getting harder and more of a pain to use!
Once you setup to allow standard users to run Time Machine backups. How do you also let them encrypt the backup? You still get asked for an admin user and password.
Agree with cashxx. Upgrading to Mavericks broke the authorisation for my Creative Cloud – and I made the mistake of contacting Adobe – which allows all manner of people who dont’ understand what’s going on in your computer, remote access. no fix, but lots of extra config. glitches… Apple might point out potential snafus when upgrading e.g. Adobe… its not like Adobe is insiginificant 3rd party software.
Anyway thanks for the path through – tangled though it is.
Hi,
this is a very good blog!!! Finally a blog that takes care on MAC OS X and business issues. Thanks for that. This one here is very explaining the new authorization funcionality in Maveric. Do you have any further information how to configure this when using usb smartcards (e.g eToken) using 2-Factor authentication during login? Would be very interesting.
Thank you so much for your Tutorial, it was very helpful!! What I do not understand is why i can’t change anything in the authenticate-admin, the authenticate-admin-30 or the authenticate-session-owner-or-admin rule. Anyone has an idea?
I used the following command:
security authorizationdb read authenticate-admin > /tmp/test.plist
/usr/libexec/PlistBuddy -c “Set :group powerusers” /tmp/test.plist
security authorizationdb write authenticate-admin < /tmp/test.plist
The first two lines work ok but it won't write it back into the auth DB. The same command even won't work if i leave away the second line and change nothing in the plist file. Does anyone has tips or ideas how to resolve this? or inputs why it doesn't work?
Great information. Is this still current for Yosemite?
Jonathan: Yes – I have been using this sort of workflow as of 10.10.4 / 10.10.5 deployments.
We are thinking about writing a script that would interface with the authorization database and allow easy programmatic management, similar in functionality as our privacy service manager:
https://github.com/univ-of-utah-marriott-library-apple/privacy_services_manager
And maybe, include options for frequent managed items to simplify management.
Do you think this community would be interested in this type of script?
Or can you get all the functionality needed using the “security” command?
Brilliant!
Thank you!
Thank yoy for beryu much. I apprecciate thiss…
hahahahahaha
Is this still working on 10.12/10.13 ?
I managed to add a new ‘group’ for example on my plist but when I want to write the change back, it looks like it’s not being applied.
Yes it still works all the way in Mojave and Catalina.
is anyone successfully unlocking security and privacy for NON-admins? I cannot figure out how to do it ? I’ve followed this here: https://www.jamf.com/jamf-nation/discussions/11552/enabling-non-admin-users-to-access-the-security-privacy-preference-panel-in-mavericks
but no luck? Any thoughts?