Migrating OS X VMs files without VMware Standalone Converter
In one of the comments to my earlier post about migrating OS X VMs to ESXi, Alan Gordon mentioned another way to convert an OS X VM’s vmdk file to an ESXi-compatible format.
Since the process I developed is ultimately about getting the OS X VM’s vmdk file up to the ESXi server, then building a new VM on the ESXi server to use that vmdk file, this is an easier technique because it allows us to skip using VMware Standalone Converter altogether. Instead, this procedure will use the vmware-vdiskmanager tool included with VMware Fusion and the VMware vSphere Client application. See below the jump for details.
Converting the OS X VM’s vmdk file
1. Open Terminal
2. Run the following command, inserting the correct VMWare Fusion vmdk file source and new vmdk destination:
/Applications/VMware\ Fusion.app/Contents/Library/vmware-vdiskmanager -r /path/to/vmware_fusion.vmwarevm/vmware_fusion.vmdk -t 4 /path/to/esxi.vmdk
3. Once the conversion process has completed, you will see that the conversion process has created two files:
filename.vmdk
filename-flat.vmdk
This is normal and ESXi will need both of these files.
4. Store both files somewhere where you can access them from Windows with the VMware vSphere Client application.
5. Quit out of Terminal.
Using VMware vSphere Client to create a new VM and upload the converted vmdk files
1. Launch VMware vSphere Client and log into the ESXi server.
2. If the ESXi server is using a self-signed SSL certificate, a warning will appear. Click the Ignore button to continue.
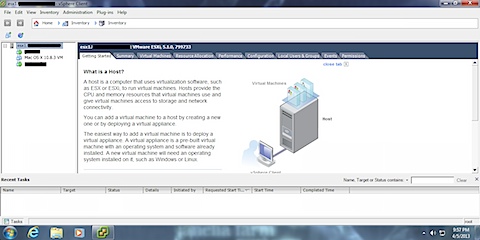
3. The ESXi administration console should appear.
4. Select File: New: Virtual Machine… to create a new VM.
5. In the Configuration window, select Custom. This option is needed because we need to set this VM to initially have no disk associated with it.
6. In the Name and Location window, name the new VM as desired. In this case, I’m naming it troutont-vm2.
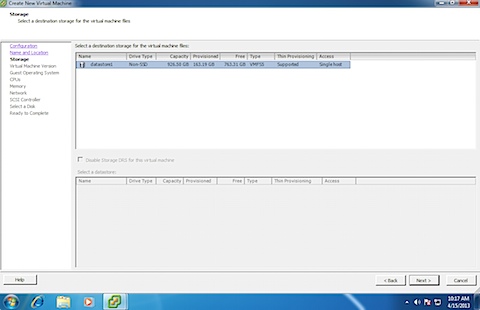
7. In the Storage window, select the datastore where you want to store the new VM.
8. In the Virtual Machine Version window, use the default option of Virtual Machine Version: 8.
9. In the Guest Operating System window, select the following options:
Guest Operating System: Other
Version: Apple Mac OS X 10.7 (64-bit)
10. In the CPUs window, select the desired number of cores.
11. In the Memory window, select the desired memory configuration.
12. In the Network window, select the desired number of network cards.
13. In the SCSI Controller window, leave it at the default selected SCSI controller.
14. In the Select a Disk window, choose the Do not create disk option.
15. In the Ready to Complete window, verify everything looks OK and hit the Finish button.
The new VM should now be listed. The next step is now to upload the converted vmdk files and associate them with the VM.
16. In your ESXi server settings, select the Configuration tab then click on Storage.
17. In Storage, select your datastore and right-click to select Browse Datastore…
18. In the list of folders that appears, select the folder name that corresponds to the newly-created VM.
19. Select the Upload button (highlighted in red below.)
20. Select the filename.vmdk and filename-flat.vmdk files and upload them individually.
21. Click the Yes button at the Upload/Download Operation Warning window.
The files will then upload.
Once both files are uploaded, you should see only the filename.vmdk file showing in the Datastore Browser window.
Configuring the VM to use the uploaded vmdk
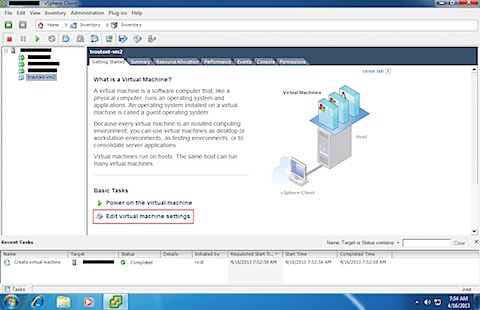
22. Click on the VM and select Edit virtual machine settings under the Get Started tab.
23. Click the Add… button in the Virtual Machine Properties window.
24. For Device Type, select Hard Disk
25. In the Select a Disk window, choose the Use an existing virtual disk option.
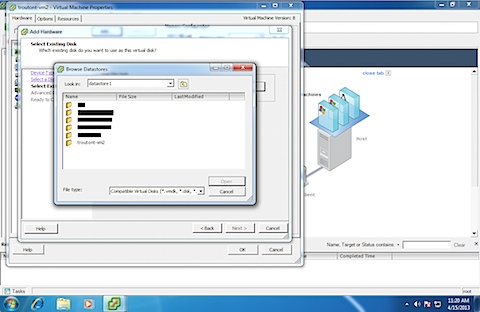
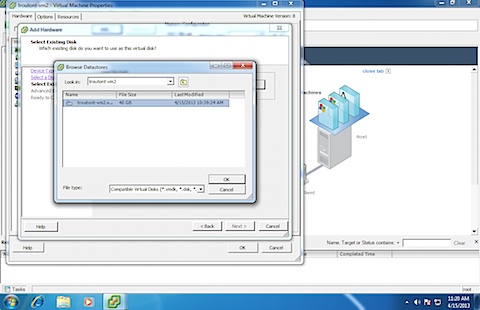
26. Select the datastore with the newly-created VM and hit the Open button.
27. Select the uploaded .vmdk file inside the VM and hit the OK button.
28. In the Advanced Options window, leave the settings at the default configuration.
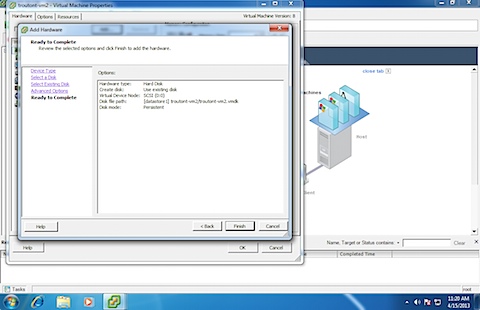
29. In the Ready to Complete window, verify everything looks OK and hit the Finish button.
30. The new hard disk should now be listed. Hit the OK button to close the Virtual Machine Properties window.
With the uploaded VM removed, the new VM can be booted to verify that it is working correctly.













Hi Rich, thanks for an awesome article. When we run the command to convert to ESXi format, Terminal shows completion, but never gets back to the prompt:
———- start ———-
$ sudo /Applications/VMware\ Fusion.app/Contents/Library/vmware-vdiskmanager -r ./OSX-1083-12D78/OSX-1083-12D78.vmwarevm/Virtual\ Disk.vmdk -t 4 ./OSX-1083-12D78.vmdk
Password:
Creating disk ‘./OSX-1083-12D78.vmdk’
Convert: 100% done.
———- end ———-
I waited a couple hours to be sure. 😉
Don
Don,
Not sure where the problem is coming in. I just retested on both 10.7.5 and 10.8.3 and this worked fine. One thing I did not do was use sudo to run vmware-vdiskmanager with root privileges; not sure if that makes a functional difference.
What version of VMware Fusion are you running? All my testing was done with VMware Fusion 5.0.3.
Hi Rich, I’m running 5.0.2 and no updates available. Hmm. I ran it again and it completed fine for both 10.7.5 and 10.8.3. 🙂 The original VMs were about 11 GB, and I noticed if I have “Split into 2 GB files” checked, the converted image is 40 GB, else unchecked it’s 80 GB.
OK, the 10.7.5 virtual machine is 40 GB because VMware Fusion 5 allows that size…the 10.8.3 virtual machine is 80 GB because VMware Fusion 5 doesn’t allow anything smaller. Looking at my notes, I actually got the same behavior on completion as before. 10.7.5 image shows “Virtual disk conversion successful.” but the 10.8.3 image hangs at “Convert: 100% done.” (even though it appears to have completed).
…I just noticed there is a folder and file in the 10.8.3 working folder, the folder being at the same level as the (hopefully) completed converted virtual image:
WorkingFolder/OSX-1083-12D78.vmdk.lck/M58857.lck
…drumroll, I updated to 5.0.3 and it all works fine now (not sure why VMware doesn’t “see” the update). Have a great weekend. 🙂
Is this special sauce to convert the VMs from running on Fusion onto a Bare Iron xServe with ESXI loaded on it or to run in any ESXi environment?
The converted VMs will run in an ESXi server installed on Apple hardware. OS X VMs running on non-Apple hardware will violate Apple’s license terms for OS X.
Most excellent! This is why we purchased the non-RAID backplanes for 4 of the last 9 xServes we ordered (after Apple “upgraded” us.. grr…)! 🙂 Just checking 🙂