Setting up ESXi 5.1 on a 2011 Mac Mini Server
One thing I’ve wanted to do for a while is virtualizing my home server setup, as well as making it easier to stand up (and take down) test servers as needed.
I’ve been doing a lot of work with VMWare Fusion on my Mac and could have gone that way, but I wanted to do the virtualization with VMWare’s free ESXi software. I hadn’t previously set up a dedicated hypervisor, so I wanted to learn how to do that.
I have a 2011 Mac Mini Server, which is fortunate because setting up ESXi on that Mini model has been well-documented in a number of places. The latest available version as of this date is ESXi 5.1, so I decided to install that. After some work, I now have ESX 5.1 running on my Mini Server. See below the jump for the details.
One thing to keep in mind is that ESXi is not officially supported on the Mac Mini. It works, but getting it running will take some work. Specifically, you will need to add the following ethernet driver to the ESXi install ISO file:
The way I found out that this driver is needed is that I first tried installing the stock ESXi 5.1 install without slipstreaming the driver into the installer ISO. What happened? Everything installed fine, but networking didn’t work.
Building the ESXi installer
For the second round, I started up a Windows 7 VM and downloaded a copy of ESXi-Customizer as well as a copy of the following files from VMWare’s site:
VMware-VMvisor-Installer-5.1.0-799733.x86_64.iso
Once I had the VMWare installer files downloaded, I then used ESXi-Customizer to slipstream using the following procedure:
1. Launched ESXi-Customizer by double-clicking on the ESXi-Customizer batch file script.
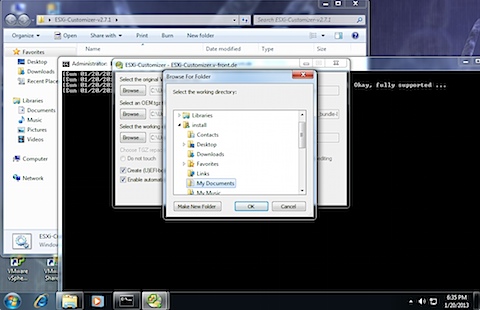
2. In the Select the original VMWare ESXi ISO: section, selected VMware-VMvisor-Installer-5.1.0-799733.x86_64.iso
3. In the Select an OEM.tgz, a VIB file or an Offline Bundle: section, selected tg3-3.123cv50.1-offline_bundle-841079.zip (corresponds to the Broadcom ethernet driver.)
4. In the Select the working directory (needs to be on a local NTFS-formatted drive): section, selected the Documents directory of my account.
5. Checked off the Create (U)EFI-bootable ISO (ESXi 5.0 only) checkbox, in order to enable the new ISO to boot the Mini.
6. Clicked the Run! button.
I received a warning that the (U)EFI-bootable ISO could not be further customized. That was fine, so I clicked the OK button.
ESXi-Customizer went to work and prompted me about replacing the ethernet driver. I wanted to do this, so I clicked the Yes button.
Once finished, the newly-created ISO was available in my account’s Documents directory as an ISO file named ESXi-5.x-Custom.iso.
My next action was to copy the ISO file from my Windows VM back into my Mac. From there, I used Disk Utility to burn the ISO file to a CD.
Installing ESXi 5.1 on the Mini
From there, I hooked up an Apple USB SuperDrive to the Mini, popped the newly-burned CD in and rebooted the Mini. When rebooting, I held down the Option key to allow the various boot drive options to appear, then selected the CD. The CD showed up with EFI Boot and Windows partitions, so I selected EFI Boot.
NOTE: All screenshots of this process are from ESXi running inside of VMWare Fusion, but the Mac Mini install process was identical.
Once booted from the CD, I was asked to select the ESXi 5.1 installer. Once selected, the ESXi installer boot process began.
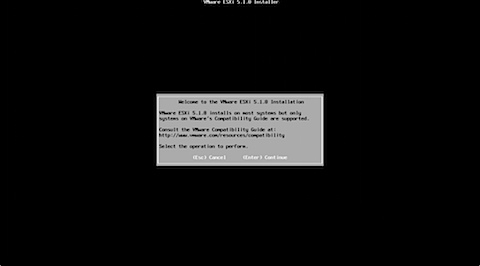
1. When asked to begin the installation process, I hit the Enter key.
2. I hit F11 to accept the license agreement.
At this point, the installer took a few minutes to scan the machine.
3. Once scanning completed, I was asked to select the drive I wanted to install on. I selected the drive I wanted and hit the Enter key.
4. I selected US Default for the keyboard layout.
5. When prompted, I set a password for the root account. This is the user account that you’ll initially use to log into your ESXi server.
At this point, the installer took a few minutes to scan the machine again.
6. The installer then confirms that you want to install using the options you’ve selected. You’re also warned that the disk will be repartitioned.
NOTE: Repartitioning will wipe everything on the drive. If you have data you need to get off of this drive, hit the Escape key to back out at this point.
7. ESXi 5.1 will then install. When finished, the installer will request that you remove the installation disc and then reboot. Once you’ve removed it, hit the Enter key to reboot.
Booting ESXi 5.1 on the Mini and changing network settings
On reboot, the Mini should now boot from the newly-created ESXi boot drive. Once up at the server display screen, you should see that it’s picked up a dynamic IP from your DHCP server and has the hostname of localhost.
Here’s how to change to a static IP and a new hostname:
1. Click the F2 key.
2. Log in as the root account, using the password you set during the install process.
3. You should be now at the System Customization screen. Select Configure Management Network.
5. In the IP Configuration settings, Select Set static IP address and network configuration: and hit the space bar to make that option active.
5. Set the static IP, subnet mask and gateway address.
6. In the DNS Configuration settings, set the address(es) of your DNS server(s) and also set your desired hostname. In my case, I set a fully qualified DNS name.
7. In the Custom DNS Suffixes settings, you may need to set a DNS suffix. In my case, my domain was already filled in.
8. Once you’ve made all of your changes, hit the Escape key to exit back to the System Customization screen. You’ll be asked to confirm the changes you’ve made to your network settings and warned that there will be a brief network outage for the ESXi server and any VMs running on it. Hit the Y key to apply the new settings.
9. At the System Customization screen, you should now see your static IP and hostname displayed under Configure Management Network.
10. Hit the Escape key to exit to the server display screen. It should now be displaying your hostname and your static IP address.
Logging to your ESXi server
To log into your ESXi server, you will need to have access to a Windows VM or a Windows PC.
1. Install the vSphere client on the Windows box.
2. Launch the vSphere client and enter the following information:
IP Address / Name: IP or DNS address of your ESXi server
User name: root
Password: the password you set during the install process
3. You’ll be warned that an untrusted SSL certificate is installed. Click the Ignore button.
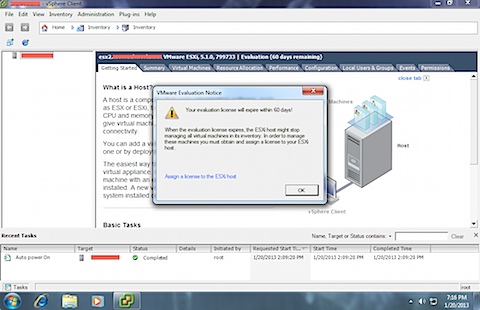
If everything worked right, at this point you should be in! You’ll be warned that you’re using a 60 day evaluation license.
If you have a VMWare account, you can log in to the VMWare website and download a free ESXi license to use with your Mini ESXi server.
Wrap-up
Overall, once I got all the pieces I needed, I found the installation and network configuration process to be fairly intuitive (which is not something you can say for all enterprise-grade software.)
There were two main issues I ran into. The first was the Broadcom network driver, which the stock ESX 5.1 install does not include. I was able to fix that by slipstreaming the driver into the ESXi installer.
The second problem was outside the ESXi server and was an issue I had with my 2012 Airport Express. Here’s the details on this issue:
I have my boxes in a couple of places. The first location is over by my TV, where the cable modem is. I have a TiVo, a home theater Mini and my main 802.11n dual-band wireless access point located there.
My office is in another room. The machines there are hooked into a gigabit switch and use an Airport Express connected to the switch to act as a wireless bridge back to the internet connection provided by the cable modem. After I set up two VMs on the ESXi server, there were now three IP addresses associated with the Mini. The Airport Express started only accepting two IP addresses from the ESXi Mini, and dropping the other.
I was able to identify the Airport Express as the problem because I could ping the third address from other machines located on that same switch. After trying to fix it a few ways, the ultimate fix was to get the Airport Express out of the loop. I did this by relocating the ESXi Mini to be stacked underneath the home theater Mini in the TV cabinet. Once the Airport Express was no longer providing the network connection, the ESXi server’s three IP addresses were all available.


Great write-up, Rich. I’m wondering if any visitors to your blog have successfully done the same with a 2012 mini yet and can confirm if the drivers that are available for the Thunderbolt Ethernet adapter still work?
I’ve been running this setup for a while now and it rocks. For others, you’re beat off following the hardcore VMware folks (@brianlam for example) on twitter etc.
Curious to see if MacMiniColo with start offering this kind of configuration.
This write-up and downloadable, pre-customized installation image saved me a lot of trouble getting ESXi 5.1 running on our Late 2012 Mac mini Servers (6,2): http://www.virtuallyghetto.com/2012/12/running-esxi-50-51-on-2012-mac-mini-62.html
Rich,
A somewhat ignorant question as I consider trying this on my test server (which happens to be this model): does the system make any allowance for mirroring the drives in the machine?
best regards,
Chris Dawe
Chris,
To the best of my knowledge, ESXi does not support software RAIDs. If you need RAID capability, I recommend setting up a RAID’d NAS and then using NFS or iSCSI to mount the RAID as ESXi-accessible storage.
Fair enough. Thanks for your reply.
I’ll confirm that. Software RAID is not a possibility for VMFS volumes. But… There are are options. One trick I’ve used for building robust standalone ESX appliances is to install a Solaris (or Linux, or FreeNAS or whatever) that supports software RAID and then to use the VM to republish the disks back to the ESXi server via NFS or iSCSI.
If you use a ZFS based appliance, you can them simplify your backups by replicated the zfs volume across the network to another machine with ZFS capabilities.
This sounds like a really interesting, although potentially complex setup! Do you have a link to a blog post or other resources documenting how to achieve this, Erik? Some more implementation details would be very welcome.
As it happens, I just bought a colocated Mac Mini with ESXi installed and I’m in the process of writing up an article on how to set it up with an IPSec tunnel and then ZFS storage for reliability and simplified backups.
I have set up Software RAID volumes under Mac OS on an ESXi host. Just create two virtual disks of identical size in each datastore, and connect them to the guest OS. Then create them as you normally would.
I assume ESXi takes the entire hard drive partition and runs fully with its own Linux based OS, but Workstation runs on Windows or other OS. So Workstation is more resource intensive?
Please let me know if this is incorrect or other input anyone has. Thank you
Great notes and great site!
Can you get a OS X Client virtual machine on ESXi to Netboot?
I know VMWare Fusion 5 has the capability, but wouldn’t it be nice to have a completely virtualised home lab sitting on the ESXi host?
FYI While I can’t seem to get a ESXi VM to NetBoot, I have opted for simply creating a template VM in ESXi with a DeployStudio bootable external drive as one of the virtual disks and a blank HFS formatted virtual disk as another.
The advantage of this scenario is that client and server testing all happen on the ESXi host. Super speedy for testing deployments and builds, and a bit more robust because it is completely self-contained; only the ESXi host is required. (Don’t forget to choose an IDE controller when adding the boot disk for the VM so DeployStudio will see it.)
Are you able to give a walk through on how you set up Deploy Studio on your ESXi server?
Great tutorial! However, I had to use the ESXi Customizer a tiny bit different. I downloaded the driver as per the link stated. I copied the MD5 checksum from VMware’s site, and calculated it once downloaded, and that was a perfect match. The instruction says that I should browse to the location of the downloaded zip file. Then I run the customizer but at the end I get a fatal error saying that the file is corrupt! Rubbish, can’t be, the checksums match. Instead I use the approach to manually unzip the downloaded file, and in customizer I then browse to the VIB file instead. I guess that that is what the script does anyway. Run again and this time I end up with a customized iso. I go ahead as instructed, and finally I get a fully working machine. Amazing. I have some experience with ESXi 5.1 before, but that is on an old Windows platform with a weaker CPU, less memory and a huge old fashioned case. Now I have a Mac Mini i7 with 16 GB of memory. Yes, I can confirm that 16 GB really works, I bought Cruzial chips that were officially supported for the mini. Works like a charm!
Awesome article!
This also works on a Mid-2011 iMac by the way.
Can I ask a rather stupid question. Once you have your ESXi Mac Mini setup can you then setup a virtualised Mac OS inside the hypervisor.
Not a stupid question, but yes, Matthew, you can, within some limits. It’s one of the appeals of this setup. ESXi is the only “bare metal” hypervisor that supports OS X as a guest OS. From Apple’s EULA’s perspective you must use Apple hardware too. Have a read of this: http://www.virtuallyghetto.com/2011/08/when-can-i-run-apple-osx-on-vsphere-5.html
…and this: https://derflounder.wordpress.com/2013/04/06/migrating-os-x-vms-to-a-vmware-esxi-server/
Sweet, in 5.1 Update 1 ethernet works as is.
Can anyone explain how to boot into Deploy Studio on their ESXi server. I would like to get this setup so I can start using our test images instead of having to manually install the OS from an ISO file. I know VMware Fusion does it but I’d rather use ESXi.
After spending hours of testing I originally failed getting the VM to boot into Deploy Studio (from System Preferences/Startup Disk, command line, creating a Deploy Studio ISO file). I was about to give up but before I tried the following and it worked so here you go for those wanting to use Deploy Studio on their ESXi server:
– Created a new VM,
– Added a second hard drive (5GB),
– Installed a fresh 10.8.3 (this is just the OS I used) ISO on the primary hard drive (20GB),
– After getting past the welcome screen/introduction questions I went to Disk Utility to make 1 partition on the 5GB drive,
– Downloaded/installed the latest Deploy Studio (v1.6),
– Used Deploy Studio Assistant to “Create a bootable external drive (Thunderbolt, Firewire & USB)” on the 5GB (second hard drive)
– After its completed go to System Preferences/Startup Disk and select the “DeployStudioRuntimeHD” device,
– If all goes well it will boot into your Deploy Studio where you can use any workflow you have created.
Helpful tips:
– If your VM keeps booting into Deploy Studio change the startup disk to the other hard drive from the Utilities drop down menu while in Deploy Studio.
– To create additional VM’s like the one explain above, go into the datastore, find the name of your VM and open the folder, locate the 5GB hard drive (.vmdk file) you created Deploy Studio on, create a new folder in your datastore called “VMDKs” and copy that file into the folder. When you go to create a new VM, when adding the second hard drive instead of selecting “create a new virtual disk” you will choose “use an existing virtual disk”, then select the file you just copied into your VMDKs folder. This will basically skip the whole downloading/install Deploy Studio on the second hard drive step (little bit of a time saver).
fracus,
A bit of a late of a reply, but that is actually what I did! Sorry, I was on holiday and I could’ve save you hours, but the process is sometimes half the fun, right? (NOT!)
Do you know if the Promise Pegasus R6 Thunderbolt array is visible to ESXi to use as Storage?
Excellent—looking forward to reading it. Please remember to post the link here when you’ve published it.
@JoeCarroll. Three part article up at http://blog.infrageeks.com/blog/2014/2/25/mac-mini-hosting.html. Overview, simple step-by-step for the config & networking, & ZFS “loopback”