Using fdesetup with Mountain Lion’s FileVault 2
With the release of Mountain Lion, Apple has introduced fdesetup, a new command-line tool for enabling, administering and disabling Apple’s FileVault 2 encryption. This tool gives Mac administrators a number of command-line abilities, including the following:
- Enable or disable FileVault 2 encryption on a particular Mac
- Use an individual recovery key, an institutional recovery key, or both kinds of recovery key.
- Enable one or multiple user accounts at the time of encryption
- Get a list of FileVault 2-enabled users on a particular machine
- Add additional users after FileVault has been enabled
- Remove users from the list of FileVault enabled accounts
- Report on the status of FileVault 2 encryption or decryption
See below the jump for examples of what you can do with it.
Enabling FileVault 2 encryption for one or multiple users
fdesetup is amazingly flexible when it comes to enabling FileVault 2 encryption from the command-line. To start with the simplest method, run the following command to enable FileVault 2 encryption:
sudo fdesetup enable
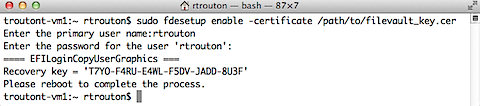
You’ll be prompted for the username and password of the primary user, which is the account you want to have appear at the FileVault 2 pre-boot login screen once the encryption is turned on. If everything’s working properly, you’ll next be given an alphanumeric individual recovery key and prompted to restart.

VERY IMPORTANT: The fdesetup-generated individual recovery key is not saved anywhere outside the machine. Make a record of it or you will not have a recovery key available to help unlock your Mac’s encryption in case of a problem.
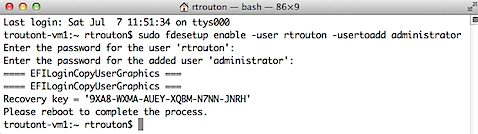
You can also enable additional user accounts at the time of encryption, as long as the accounts are either local or mobile accounts on the Mac being encrypted. Run the following command to enable FileVault 2 and specify the accounts you want:
sudo fdesetup enable -user username -usertoadd other_username -usertoadd yet_another_username
You’ll be prompted for the passwords of the accounts specified. After that, you’ll be given an alphanumeric individual recovery key and prompted to restart. All of the accounts specified should appear at the FileVault 2 pre-boot login screen.
For those who want to automate the process, fdesetup also supports importing a properly formatted plist via a standard input stream (stdin). The plist needs to follow the format below:
Username
username
Password
password
AdditionalUsers


        Username
        username
        Password
        password


        Username
        username
        Password
        password
Additional users can be added as needed by adding additional user information under the AdditionalUsers plist key.
Note: All account passwords need to be supplied in cleartext.
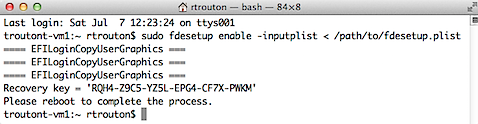
Once the plist has been set up and properly formatted, run the following command to enable FileVault 2 encryption and reference the account information in the plist file:
sudo fdesetup enable -inputplist < /path/to/filename.plist
Since the accounts and passwords are in the plist file, fdesetup does not need to prompt for passwords. Instead, the alphanumeric individual recovery key is displayed and the user is prompted to restart. All of the accounts specified in the plist file should appear at the FileVault 2 pre-boot login screen.
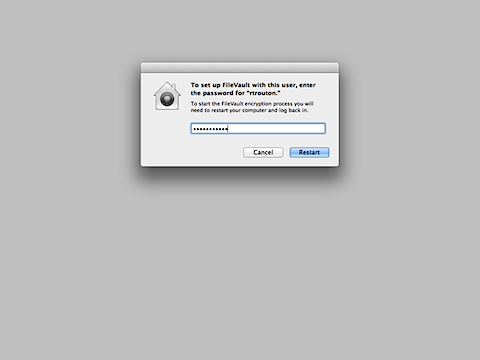
To avoid the need to enter a password, fdesetup also has a -defer flag that can be used with the “enable” command option to delay enabling FileVault 2 until after the current (or next) user logs out. With the -defer flag, the user will be prompted for their password at their next logout or restart. The recovery key information is not generated until the user password is obtained, so the -defer option requires a file location where this information will be written to as a plist file.
The property list file will be created as a root-only readable file and contain information similar to what’s show below.
	EnabledDate
	2012-07-08 08:05:54 -0400
	HardwareUUID
	00000000-0000-1000-8000-000C293DEFEC
	LVGUUID
	B7990442-91D1-4F5E-8F04-DDAC7B3610F2
	LVUUID
	FF837400-B781-496E-8992-D5A11B5A1139
	PVUUID
	E0FD9F00-5D41-4597-A10B-73F0A463CC65
	RecoveryKey
	8MGZ-C7BL-ML2M-J6B4-HN35-ZDOA
	SerialNumber
	VMWVk2fm2om0q0/em3zWsLr2g
Note: For security reasons, the plist file with the recovery key information should not stay on the encrypted system. Please copy it to a safe location and then securely delete this plist file from the encrypted system.
Run the following command to defer enabling FileVault 2 and specify the account you want:
sudo fdesetup enable -user username -defer /path/to/filename.plist

If there is no user account specified with the -user option, then the current logged-in user will be enabled for FileVault 2. If there is no user specified and no users are logged in when the command is run, then the next user that logs in will be chosen and enabled.
If you don’t want to specify the account, run the following command:
sudo fdesetup enable -defer /path/to/filename.plist

On logout, the user will be prompted to enter their account password.
Once entered, FileVault 2 will be enabled and the recovery information plist file will be created. Once the enabling process is complete, the Mac will restart.

An important thing to keep in mind about the -defer option is that it enables one single user account at the time of turning on FileVault 2 encryption. The -defer option does not enable multiple user accounts and cannot be used to enable accounts once FileVault 2 encryption has been turned on.
Enabling FileVault 2 encryption using one or multiple recovery keys
Another new capability of FileVault 2 in Mountain Lion is the ability to use the alphanumeric individual recovery key, an institutional recovery key using /Library/Keychains/FileVaultMaster.keychain, or both kinds of recovery key at the same time.
As seen in the earlier examples, fdesetup will provide the alphanumeric individual recovery key by default. To use the institutional recovery key, the -keychain flag needs to be used when enabling encryption:
sudo fdesetup enable -keychain
The alphanumeric individual recovery key is displayed, but the encryption will also use the /Library/Keychains/FileVaultMaster.keychain institutional recovery key. In case recovery is needed, either recovery key will work to unlock or decrypt the encrypted drive.

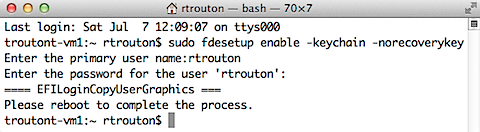
If you want to specify that only the FileVaultMaster.keychain institutional recovery key be used, both the -keychain and -norecoverykey flags need to be used when enabling encryption:
sudo fdesetup enable -keychain -norecoverykey
fdesetup is also capable of creating a FileVaultMaster.keychain institutional recovery key and automatically storing it in /Library/Keychains. To do this, an existing FileVault 2 public key needs to be available as a DER encoded .cer certificate file. Once that’s available, the following command can be run to enable FileVault 2, automatically create the institutional recovery key with the supplied public key and store it as /Library/Keychains/FileVaultMaster.keychain:
sudo fdesetup enable -certificate /path/to/filename.cer
To specify that only the FileVaultMaster.keychain institutional recovery key be used, add the -norecoverykey flag to the command:
sudo fdesetup enable -certificate /path/to/filename.cer -norecoverykey

Forcing a restart when enabling FileVault 2
Along with the various options for enabling, it’s also possible to force a restart of the Mac once FileVault 2 has been successfully configured. This can help automate the process of enabling FileVault 2 on a Mac if no input from a logged-in user is needed.
For example, an institution may want to pre-configure its Macs to automatically encrypt with FileVault 2 at first boot with a local admin account enabled. It also wants to use only the institutional recovery key. If a plist with the desired account information and a .cer file to create the institutional recovery key is available, the following command could be run to enable FileVault 2 and force a restart at the first boot:
sudo fdesetup enable -inputplist < /path/to/filename.plist -certificate /path/to/filename.cer -norecoverykey -forcerestart
Once fdesetup had finished enabling the accounts in the plist file and creating /Library/Keychains/FileVaultMaster.keychain, the Mac would immediately restart and display the enabled accounts at the pre-boot login screen.
If you want to use the alphanumeric individual recovery key with -forcerestart, you will also need to output the individual recovery key and other information into a plist file. Taking the example above, the institution’s automated setup would run the following command to automatically encrypt with FileVault 2 at first boot using both types of recovery key and a local admin account enabled:
sudo fdesetup enable -inputplist /path/to/recoverykeyinfo.plist -forcerestart
Disabling FileVault 2
In contrast to all of the various options available for enabling FileVault 2 using fdesetup, the command to turn off FileVault 2 encryption is the following:
sudo fdesetup disable
Adding additional users after FileVault has been enabled
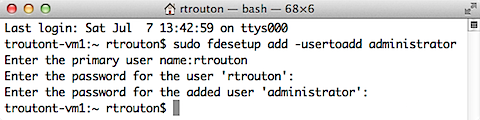
Once FileVault 2 has been enabled, you can add additional users using fdesetup. To do so, you will need to a) wait until the FileVault 2 encryption has completed and b) provide both the username and password of a previously enabled account as well as the password of the account you want to add. The following command will enable the “administrator” user:
sudo fdesetup add -usertoadd administrator
For those who want to automate the process, fdesetup also supports importing a properly formatted plist via a standard input stream (stdin). The plist needs to follow the format below:
Username
username
Password
password
AdditionalUsers


        Username
        username
        Password
        password


        Username
        username
        Password
        password
When adding additional users using a plist file, the top level Username key is ignored, and the Password key value should either be an existing FileVault user’s password or the recovery key. Additional users can be added as needed by adding additional user information under the AdditionalUsers plist key.
Note: All account passwords need to be supplied in cleartext.
Once the plist has been set up and properly formatted, run the following command to add additional users by referencing the account information in the plist file:
sudo fdesetup add -inputplist < /path/to/filename.plist

Listing current FileVault 2 users
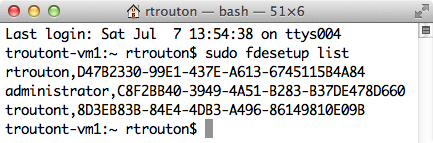
To list all accounts enabled for FileVault 2, run the following command:
sudo fdesetup list
All accounts will be listed with both the accounts’ username and UUID
Remove users from the list of FileVault enabled accounts
You can remove users from the list of FileVault enabled accounts by using either their username or the account’s UUID. To remove the account using the username, run the following command:
sudo fdesetup remove -user username

To remove the account using the account’s UUID, run the following command:
sudo fdesetup remove -uuid UUID_here

In both cases, successful removal of the account will not produce any additional output. If the account being removed is not currently enabled for use with FileVault 2, an error message will be displayed.

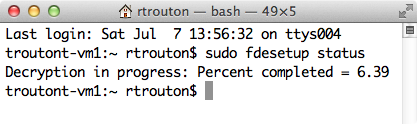
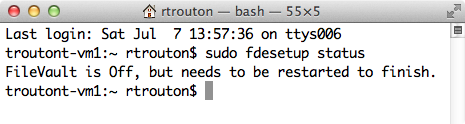
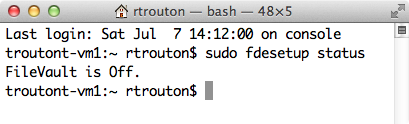
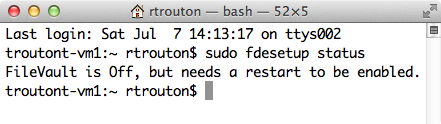
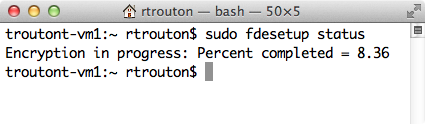
Reporting on FileVault 2 encryption or decryption status
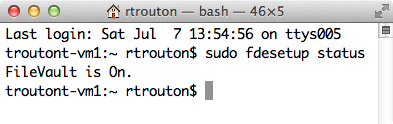
fdesetup can report on FileVault 2 encryption or decryption status. The following command will display the current state:
sudo fdesetup status
Leave a reply to Anon Cancel reply
Recent Comments
| Malcolm Hall on Secure Token and FileVault on… | |
| Malcolm Hall on Secure Token and FileVault on… | |
| fsigworth on Creating root-level directorie… | |
| Robert Winterhalter on Disabling login window clock d… | |
| jsm253 on Granting Volume Owner status o… |

Thank you for this Rich! I love the real world examples you’ve shown here.
Nice, thank you.
I just have the problem, that I try to use a pre-created Master Password/keychain and the fdesetup always says it couldn’t create the institutional user. Any advice would be really helpful…
Timo,
Try turning on FileVault 2 with your FileVaultMaster.keychain on a test box using System Preferences: FileVault. If you get the alphanumeric recovery key instead of a message that a recovery key has been set by your institution, I’d double-check your keychain to make sure the private key isn’t stored inside.
Only the public key (which shows up in the keychain as a self-signed SSL certificate) can be in FileVaultMaster.keychain when used with FileVault 2 to encrypt a Mac.
If you need more information on how to set up a FileVaultMaster keychain for use with FileVault 2, please see my slides from the Penn State MacAdmins conference, as I go into the process in detail:
You are great, this was the case. I removed the obsolete part of the FileVault keychain and it worked. Thank you alot.
Thank you very much for all the information shared here.
How did you create the FileVault 2 public key certificate?
Robert,
For a good description of how to export the public key as a .cer certificate file, I recommend you check the document at the link below:
Click to access Administering-FileVault-2-on-OS-X-Mountain-Lion-with-the-Casper-Suite.pdf
The relevant section is “To create an institutional recovery key and export it without the private key:”
Thanks,
Rich
Rich
Thanks for this great set of instructions. We’re having problems with the sync from Open Directory. What we want to do is use network users from OD and have them be added to the local machine’s Filevault users list, but when I run fdesetup sync from a machine bound to the OD server, I’m not getting the ‘newFVuser’ (for example) info I need from OD so that add -usertoadd is found. Any thoughts? Thanks!
W Andrew,
The “fdesetup sync” command can be a little misleading. It does not pull users from OD to add users; instead it’s used to automatically remove users from a Mac’s list of FileVault 2-enabled users.
The general idea is that, as people leave and their accounts are removed from your OD server, you can run “sudo fdesetup sync” (no quotes) on your Macs and those OD-removed accounts will also be removed from the Mac’s FileVault 2 pre-boot login screen.
To add them, you will need to create the accounts as OD mobile users on the Mac in question. Once that’s been done, you can run “sudo fdesetup add -usertoadd newFVuser” (no quotes) and provide the account’s password to add them to the list of FileVault 2-enabled users.
Thanks, Rich. I *totally* got that wrong, I guess.
Is there a way to suppress the exposure of the list of usernames authorized to unlock a FileVault-2 system disk at boot time? I.e. have the FileVault-2 authentication screen ask for both a username and its associated password?
Bill,
Currently, there’s no way to hide the account icons or set the FileVault 2 pre-boot login screen to display username and password blanks.
My solution to this was to create a second, sharing only user called Decrypt (short name “decrypt”)
I then ran the following commands:
sudo defaults write /Library/Preferences/com.apple.loginwindow DisableFDEAutoLogin -bool YES
sudo fdesetup add -usertoadd decrypt
sudo fdesetup remove -user
The first command disables automatic login after decrypting the system. This might not be necessary with a sharing only user since it won’t be able to log in anyway but at least it won’t try.
The second command will ask for your user password, (with a message like “a password for /”) then the password for the decrypt user.
Finally the third command removes your user from the users allowed to decrypt the system.
Because decrypt is a sharing only user, the result will be that “Decrypt” (and some default user icon) is shown with a password prompt when turning the machine on but Decrypt won’t be on the login screen.
You can obviously add as many users in this way as you like and remove as many as you like. If you had the users Bill, Sally and Mike for example, you might want Decrypt1, Decrypt2 and Decrypt3, telling Sally and Mike to use 2 and 3 respectively.
Is there anyway to encrypt a second partition with the institutional recovery key.
Martin,
Are you encrypting a boot partition or a partition that doesn’t have the OS installed on it?
Hello,
Is there a way to prevent a user from turning off File Vault other than using some solution like cauliflower vest as discussed in your FileVault Decoded talk.. I created a master keychain and used it as an institutional recovery key as explained in your talk to turn on file vault and enable the users.. Just wondering if I can prevent these users (other than me/administrator) from being able to turn off file vault / decrypt the device ??
No, there’s no current way to stop an authorized user from decrypting a FileVault 2-encrypted Mac.
If the user can log in at the pre-boot login screen, they have the ability to unlock and/or decrypt.
Hi,
“When adding additional users using a plist file, the top level Username key is ignored, and the Password key value should either be an existing FileVault user’s password or the recovery key.”
Has anyone managed to get this to work? I just get an ‘Unable to add user to existing Filevault’ if I leave the username blank and use the recovery key for the password.
I can’t think of a better way of trying to enable an admin user after first deferring the original encryption. If theres another way of doing this I’d be interested to hear it.
Thanks,
Mike
Have you happened to figure it out? I am using an institutional keychain + individual key. I’d rather not have to have a script made for each machine with their individual key. I tried using the -keychain and -certificate(with the cert I pulled out of the master keychain) and neither worked with the add verb
Michael,
When it’s working again (see my reply to Mike Wright), you would need to use the individual key with “fdesetup add”. The institutional key would not work in this case.
Mike,
It looks like the ability to use the recovery key is not working with fdesetup 1.33 (the version that comes with 10.8.2.) I’ve got a case open with Apple about it.
Rich, thanks for the insight. Glad to hear that Apple knows about the issue now, hopefully we see an update soon.
Great article Rich, thanks, especially when there’s so little online discussion about fdesetup yet.
I am having a problem with an installer I have created that creates the plist, places an institutional key in /Library/KeyChains, and directs the output to a file. There is a cocoa gui in which the user authenticates their password and reads some terms and conditions, then a shell script is run with the following command on it:
fdesetup enable -keychain -inputplist /Users/Shared/FV2_recovery.fv2
This successfully enables fdesetup on about half of the tested computers, and returns an exit status of 11 (authentication error) for the other half. Can’t seem to figure out what causes that. Any hints?
Thanks!
Hmm, sorry, that command above got formatted by WordPress to hide the greater than and less than signs and everything in between. The command line should have read:
fdesetup enable -keychain -inputplist %8B /Users/currentuser/Library/Application\ Support/Cygnius/InstallFDE.plist %9B /Users/Shared/FV2_recovery.fv2
Ok, still not working but you get what I mean!
Andrew,
Based on what you’ve stated, here’s my assumptions about what the installer is doing:
1. It creates the plist as
2. It reads the username and password of the authenticating user and adds them to the plist as the primary users
3. It then runs the following command:
If my assumptions are correct, I’d first check to see if the Username and Password keys are being written correctly to the plist by the installer. One way to test this is by having a modified copy of the installer just write the plist’s values while not enabling FileVault 2 using fdesetup.
Thanks for the fast reply! Yes, that’s more or less what I am doing. I’ll take a look at the values written in the plist and see if that’s where the problem is.
Very informative article, thanks!
We’re seeing an issue where users have Macs that are bound to AD and FileVault encrypted. Users reset their passwords through System Preferences. Everything is fine, except that the FV boot screen password doesn’t get updated.
It only unlocks with the old password. I’ve tried fdesetup sync, but that doesn’t seem to work.
Try clearing the system cache or running this command after a password change: sudo touch /System/Library/Extensions
It sounds like when you change the password it’s not updating the recovery partition, which is where the FileVault login screen is from.
Rich – have you had any more luck with this and fdesetup 1.35 in 10.8.3 ?
I still cannot get the recovery key method to add additional users. I still think this would be the best way to add an administrative user to the list after using the defer method to enable FileVault 2 in the first place…..
Thanks again,
Mike
Mike,
Sorry, not fixed in 10.8.3’s fdesetup. At this point, I don’t have an ETA from Apple on when this will be fixed.
Thanks for confirming Rich.
I am running into the same issue with 10.8.3 and user’s changing their passwords. FV2 doesn’t see the change. Also, it would be nice to be able to script adding the management account to the FV2 user list. We are only using the institutional key.
I should add our Macs are joned to AD and have mobile accounts enabled.
Looks like 10.8.4 update fixed the password syncing problem.
Hi everyone,
I too want to thank Rich for putting this info together and for sharing it.
I’m having a similar issue as Michael is having (post #31).
I’m testing with a 10.8.5 build.
The problem I’m having is that after using a recovery key and then taken to the password reset window, the AD user is not able to reset the password. I’ve tried with three different AD accounts and it did not work. I did noticed that in all three incidents, there seems to be a communication between the DC and the AD accounts, as the accounts are getting locked.
To root out if this could be an issue with the build/image & the binding script we’re using here, I will also test with a brand new fresh 10.8 installation, fully updated it to 10.8.5, and then do a manual binding process.
I will report on the result of the fresh installation/manual binding process above, but in the mean time, for the life of me, I’ve tried everything I know and had no success so far – hoping someone here can help or point me on the right direction.
Thank you,
Len
Len,
That functionality is built to reset the password of a local account. If an AD-bound Mac can contact the domain controller, the password which is set on the domain controller will be the password that the AD account on the Mac will use.
Have you tried changing the account’s password on the AD domain controller, then entering that new AD-changed password into the password reset blanks?
Hi rtrouton,
Thank you for your response here.
I tried your “tried changing the account’s password on the AD domain controller” suggestion, and it worked. I got the usual Keychain prompt “to update/to create Keychain password or to continue to log in” – I can live with this. We can train users and the help desk on how to proceed with this.
Now, the above seems to work great for a scenario when the user is plugged in to the office/Network, or somehow at that point has a Network connectivity (either via Ethernet or secured WiFi that can hit the DC) and there is communication between the AD user account and the DC at that point… how about when this is not the case, what can be done?
Thank you,
Len
Hi Rich,
I want to follow up with another test/issue I’m running into here – hoping you can provide some assistance.
Scenario: Mobile managed account, user is not in the office, doesn’t remember the pre-boot log in password, and recovery key is used to continue the pre-boot log in process.
Based on the scenario above, as you know, the user will be taken to the Mac OS X log in window. At this point, the user will be prompted to reset the password. I’ve tried different combinations of a new/reset password input.. for example, entering a new password on all fields (password, new password, and verify password), or entering a password on the “reset password” fields only; however, nothing works.
I’ve also tried using the Master password method, and it’s of no avail. The Master password does work as I’ve used it in other instances to unlock the drive.
You see my predicament here… I have a user who we are able to help pass further the pre-boot log in by providing a recovery key, but the user is not able to pass further the Mac OS X profile to access the Desktop, files, etc.
Now I clearly see why you said on your keynote that FV2 is more interesting in keeping you OUT! On the case above, it sure is doing a pretty good job at it.
Anything else I can do, try? Again, keeping in mind that on the scenario above, the user is not in the office.
Thank you,
Len
Len,
Not sure there’s a good answer in this case. What would you do with an unencrypted user with the same kind of account who was in a similar situation?
Hi Rich,
Thank you for your response here.
I see the smart point you’re making.
In an end of the world, super emergency scenario, at that point, one would have to give the user the root credential to log in and walk the user through the path to access the home user folder. Then again, on this situation, there goes security and the root credential has been exposed!
I see the situations I’m running into could be major road block on not implementing FV2.
Things work great on local account and FV2 – wish it were the same with respect to Managed Mobile profile/account.
Once again, thank you very much for your input and assistance, Rich!
Much appreciate it,
Len
Rich, you rock. This article is a huge help. One question: I’ve tried using “sudo fdesetup add -inputplist < /path/to/filename.plist" to add an admin user to FV2 *using the PRK as the primary user's password string in the plist file*, but it doesn't work. It does work when using the primary user's password itself, just not with the PRK. Any guidance?
Noam,
In Mountain Lion, using the personal recovery key to enable accounts is supposed to work, but it doesn’t (this was fixed in Mavericks.) As an alternative, you can use an admin account’s password to enable accounts.
I have a post here showing how this works: https://derflounder.wordpress.com/2013/10/24/enabling-users-for-filevault-2-with-a-non-enabled-admin-user-does-not-work-in-mavericks/
As an aside is there any information available on how to associate a recovery keychain with an encrypted core storage volume, where this is done without reference to FileVault?
diskutil corestorage allows an encrypted volume to be unlocked or decrypted (revert) with a -recoverykeychain /path/to/keychain option but if I generate a key pair via a new keychain how do I associate it with the encrypted volume? Is such possible?
Hi Rich,
After disabling FileVault 2 on a users computer, the prompt to enable FileVault continues to appear when the user logs off. I have disabled the policy in Casper and removed the JamF binary, yet the prompt continues to appear. What can I do to make this go away?
Thanks,
Chuck
Hi Guys,
How is it possible to setup a disk password (instead of user password) ?
It was working unless I accidentally click on “enable additional accounts”
(I can’t remember/find how I did it the last time).
Thanks for a great post! I’ve referred to it countless times over the years.
I have a new situation. I’m on High Sierra, and I’ve encrypted the disk using terminal and diskutil to encrypt the volume with a passphrase. I don’t want any users, even admin users, to be able to unlock the disk with their user account password; I want Disk Password to be the only choice to unlock the disk.
There are two admin users on this system. I can use this command to disable FileVault access for one of them:
sudo fdesetup remove -user username
But when I try to run the command to remove the second user from FileVault, it gives me the following error:
Error: Unable to remove user ‘username’ (25: User could not be removed because it’s the last OS user on the volume.).
I realize fdesetup is trying to keep me from locking myself out of my disk altogether, but the disk password option still exists, and it’s the only option I want.
I’ve looked for a command within diskutil apfs that might let me remove the user, but so far, no dice. Is there a way around this with FileVault on APFS volumes? I really want to remove that other user so that Disk Password is the ONLY option offered when booting cold.
I want to do the same. Did you realized how to achieve it?